This workshop is designed to introduce developers to ThoughtSpot Everywhere, how to embed analytics into JavaScript-based web applications, and integrate ThoughtSpot into typical devops toolchains. No prior experience, or paid software licenses, is required.
What you will learn
The workshop is broken into 2 parts, with the learning objectives as follows. Each part is intended to build upon the last. You must complete one before moving onto the next.
Part 1: Build with Low Code Developer Tools
- How to create search, visualizations, and liveboards to analyze data
- How to use the developer playground to generate javascript code to embed ThoughtSpot elements into a web app
- How to modify actions available to users and apply hidden runtime filters
Part 2: Embed Analytics with Visual Embed SDK
- How to use the Visual Embed SDK to embed ThoughtSpot components into a ReactJS web app
- Using the platform event framework to interact with embedded components
Bonus: Using Platform APIs and TML
- How to use ThoughtSpot Everywhere APIs and ThoughtSpot Modeling Language to perform typical devops tasks
- Using Postman to manage API collections with ThoughtSpot
ThoughtSpot Free Trial
To begin, sign up for a free ThoughtSpot 30 day trial account. You will be prompted to enter a business email and a few other pieces of contact information. You will also be asked which cloud database you are using. Go ahead and select your preferred database. Don't worry if you don't have one; just pick the one you are most interested in. We are going to use a sample dataset for this tutorial. In a few minutes, check your email to complete the activation of your trial account. Once you have successfully logged in, you can continue.
Part 1 of this workshop will leverage the low-code tools to create search, visualizations, and liveboards to analyze data. And, introduce you to the developer playground to generate javascript code to embed ThoughtSpot elements into a web app.
You will create a couple of fresh ThoughtSpot Answers using the default Sample Retail - Apparel worksheet and Pin them in a new Liveboard. The new liveboard will then be used in the Developer Playground to generate much of the JavaScript code required to embed ThoughtSpot into webapps.
Sales Trends
Start by selecting Search Data from the Home page as shown below
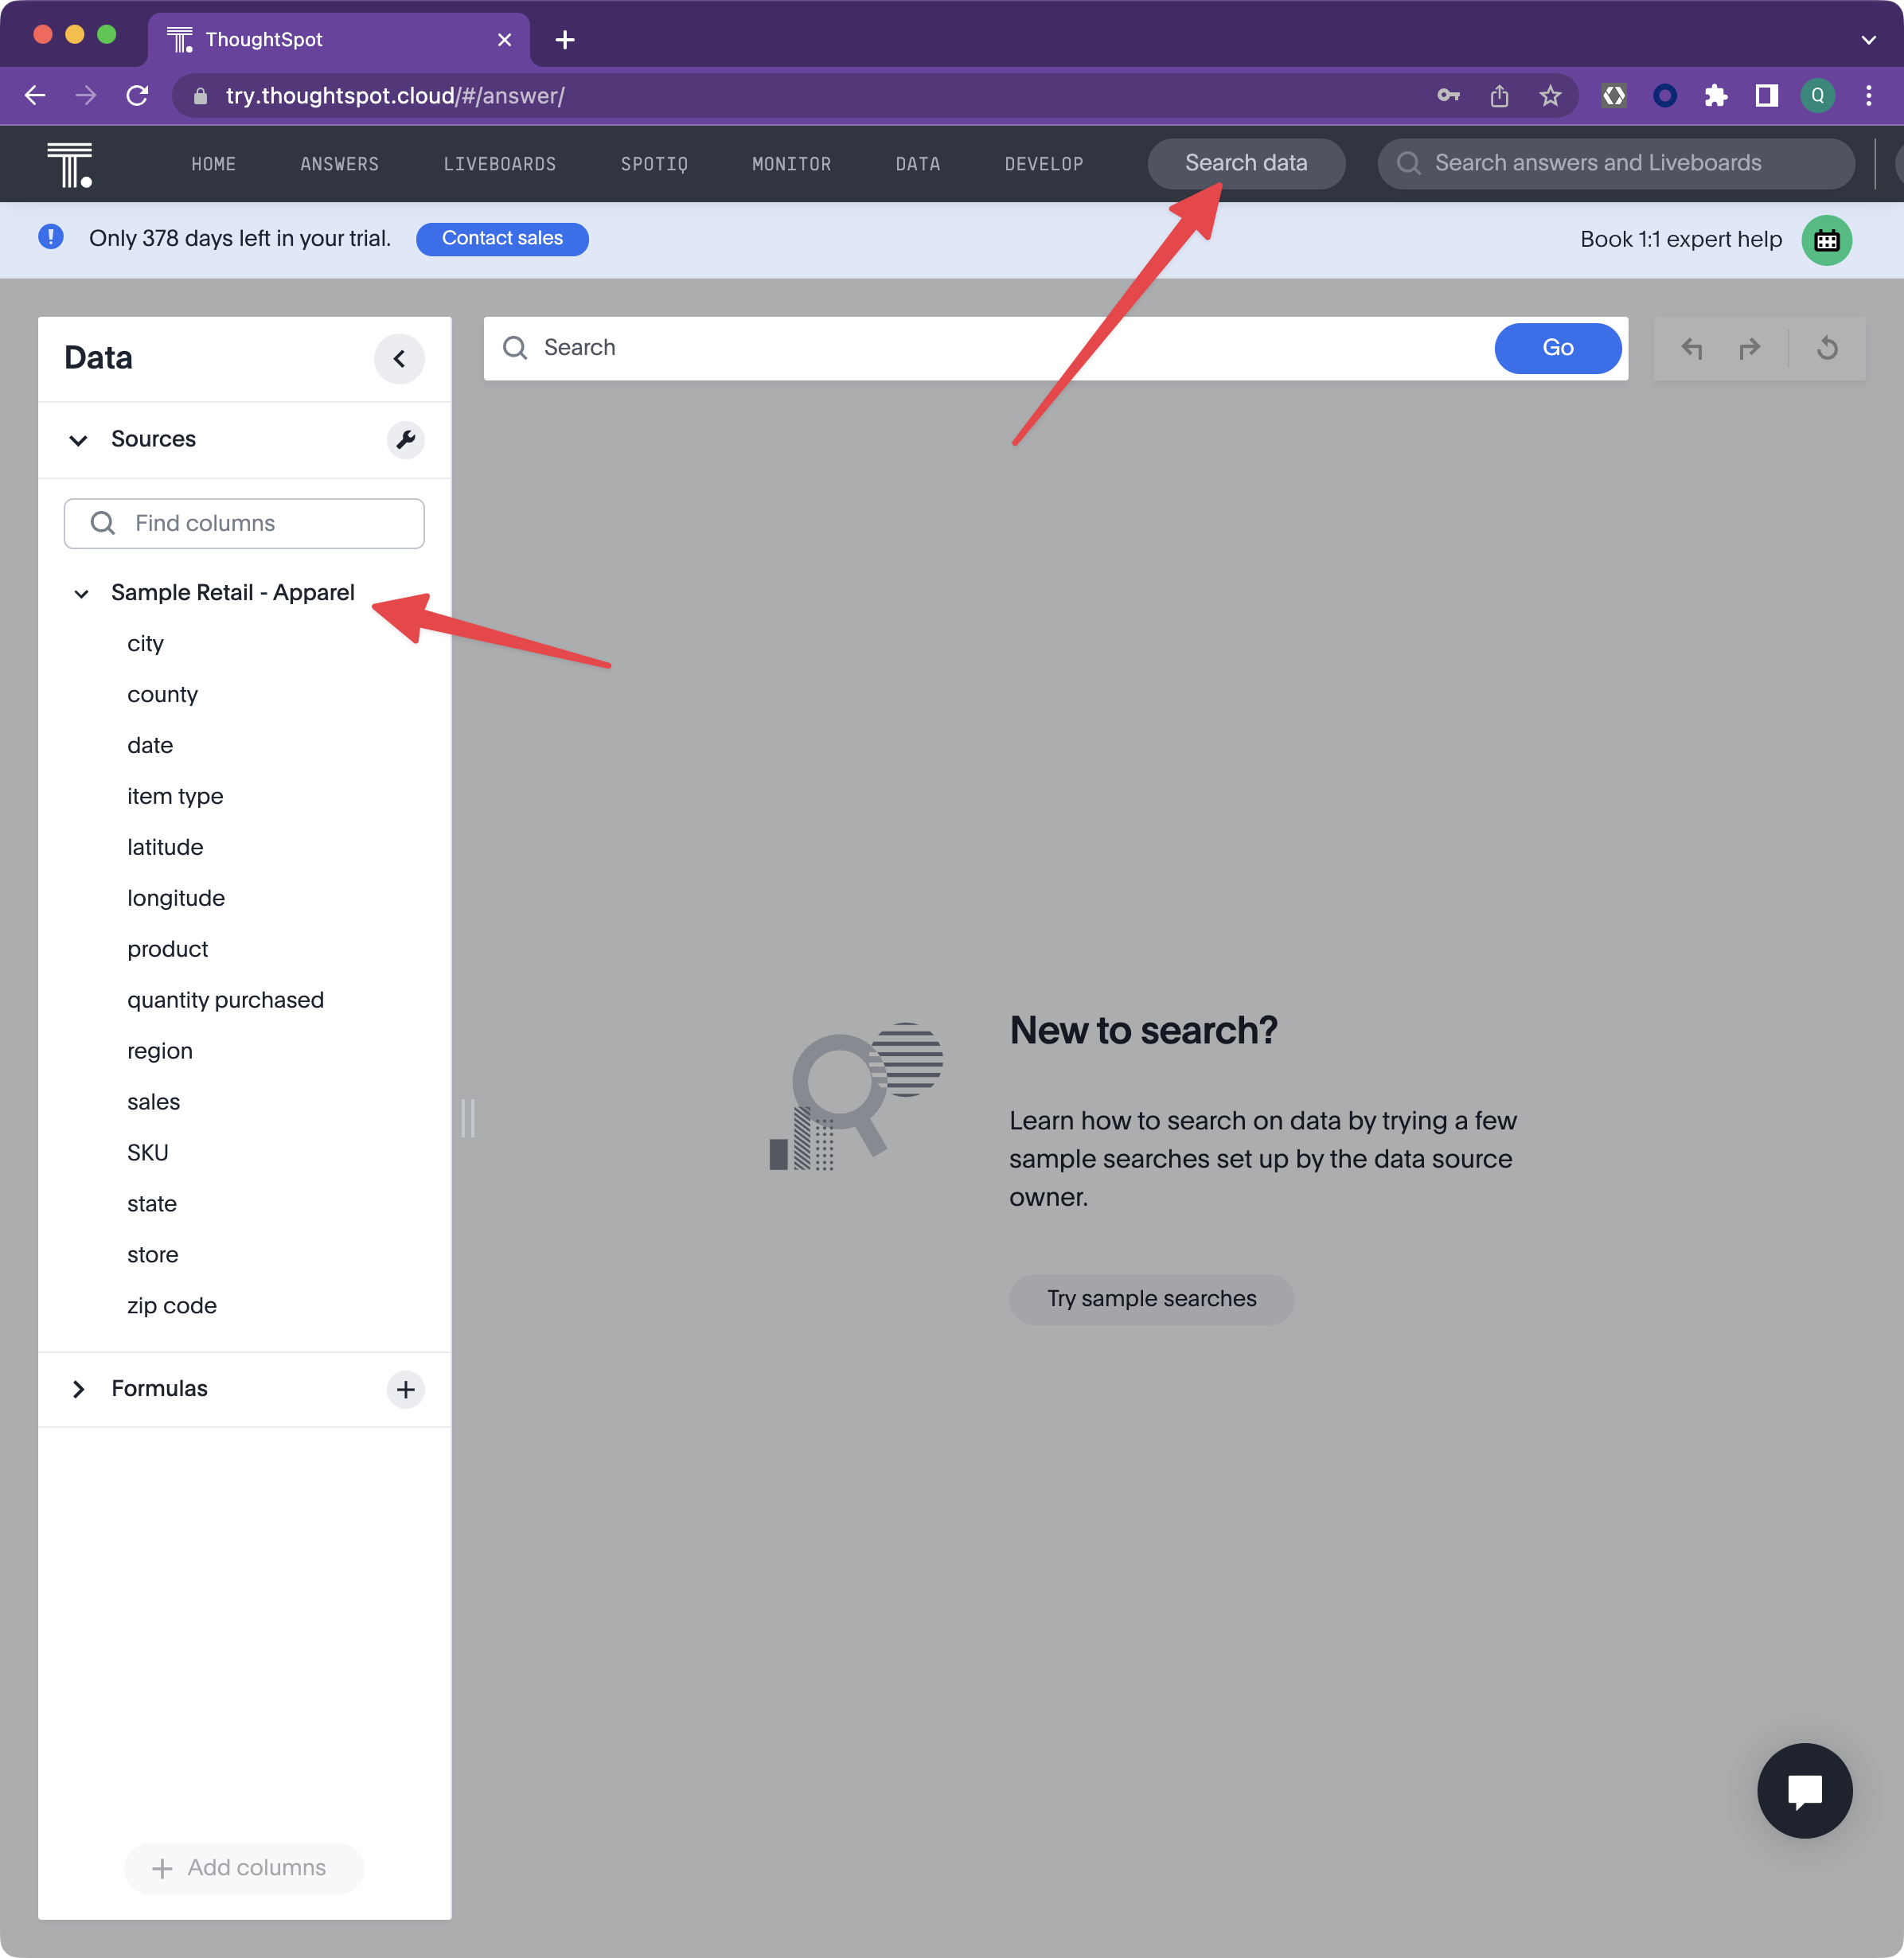
- Confirm that Sample Retail - Apparel is the selected data source.
The Search Answers and Search Data buttons toggle and are sticky meaning the next time you visit the home page and select the search bar it will bring you right to the Search Data search bar.
- Let's create the first search result for your liveboard that shows the Show the monthly trend of sales over the last 2 years
- Enter in the search bar: Sales Monthly Last 2 years
- Press Enter, Select Go, or click below the search bar to launch the query.
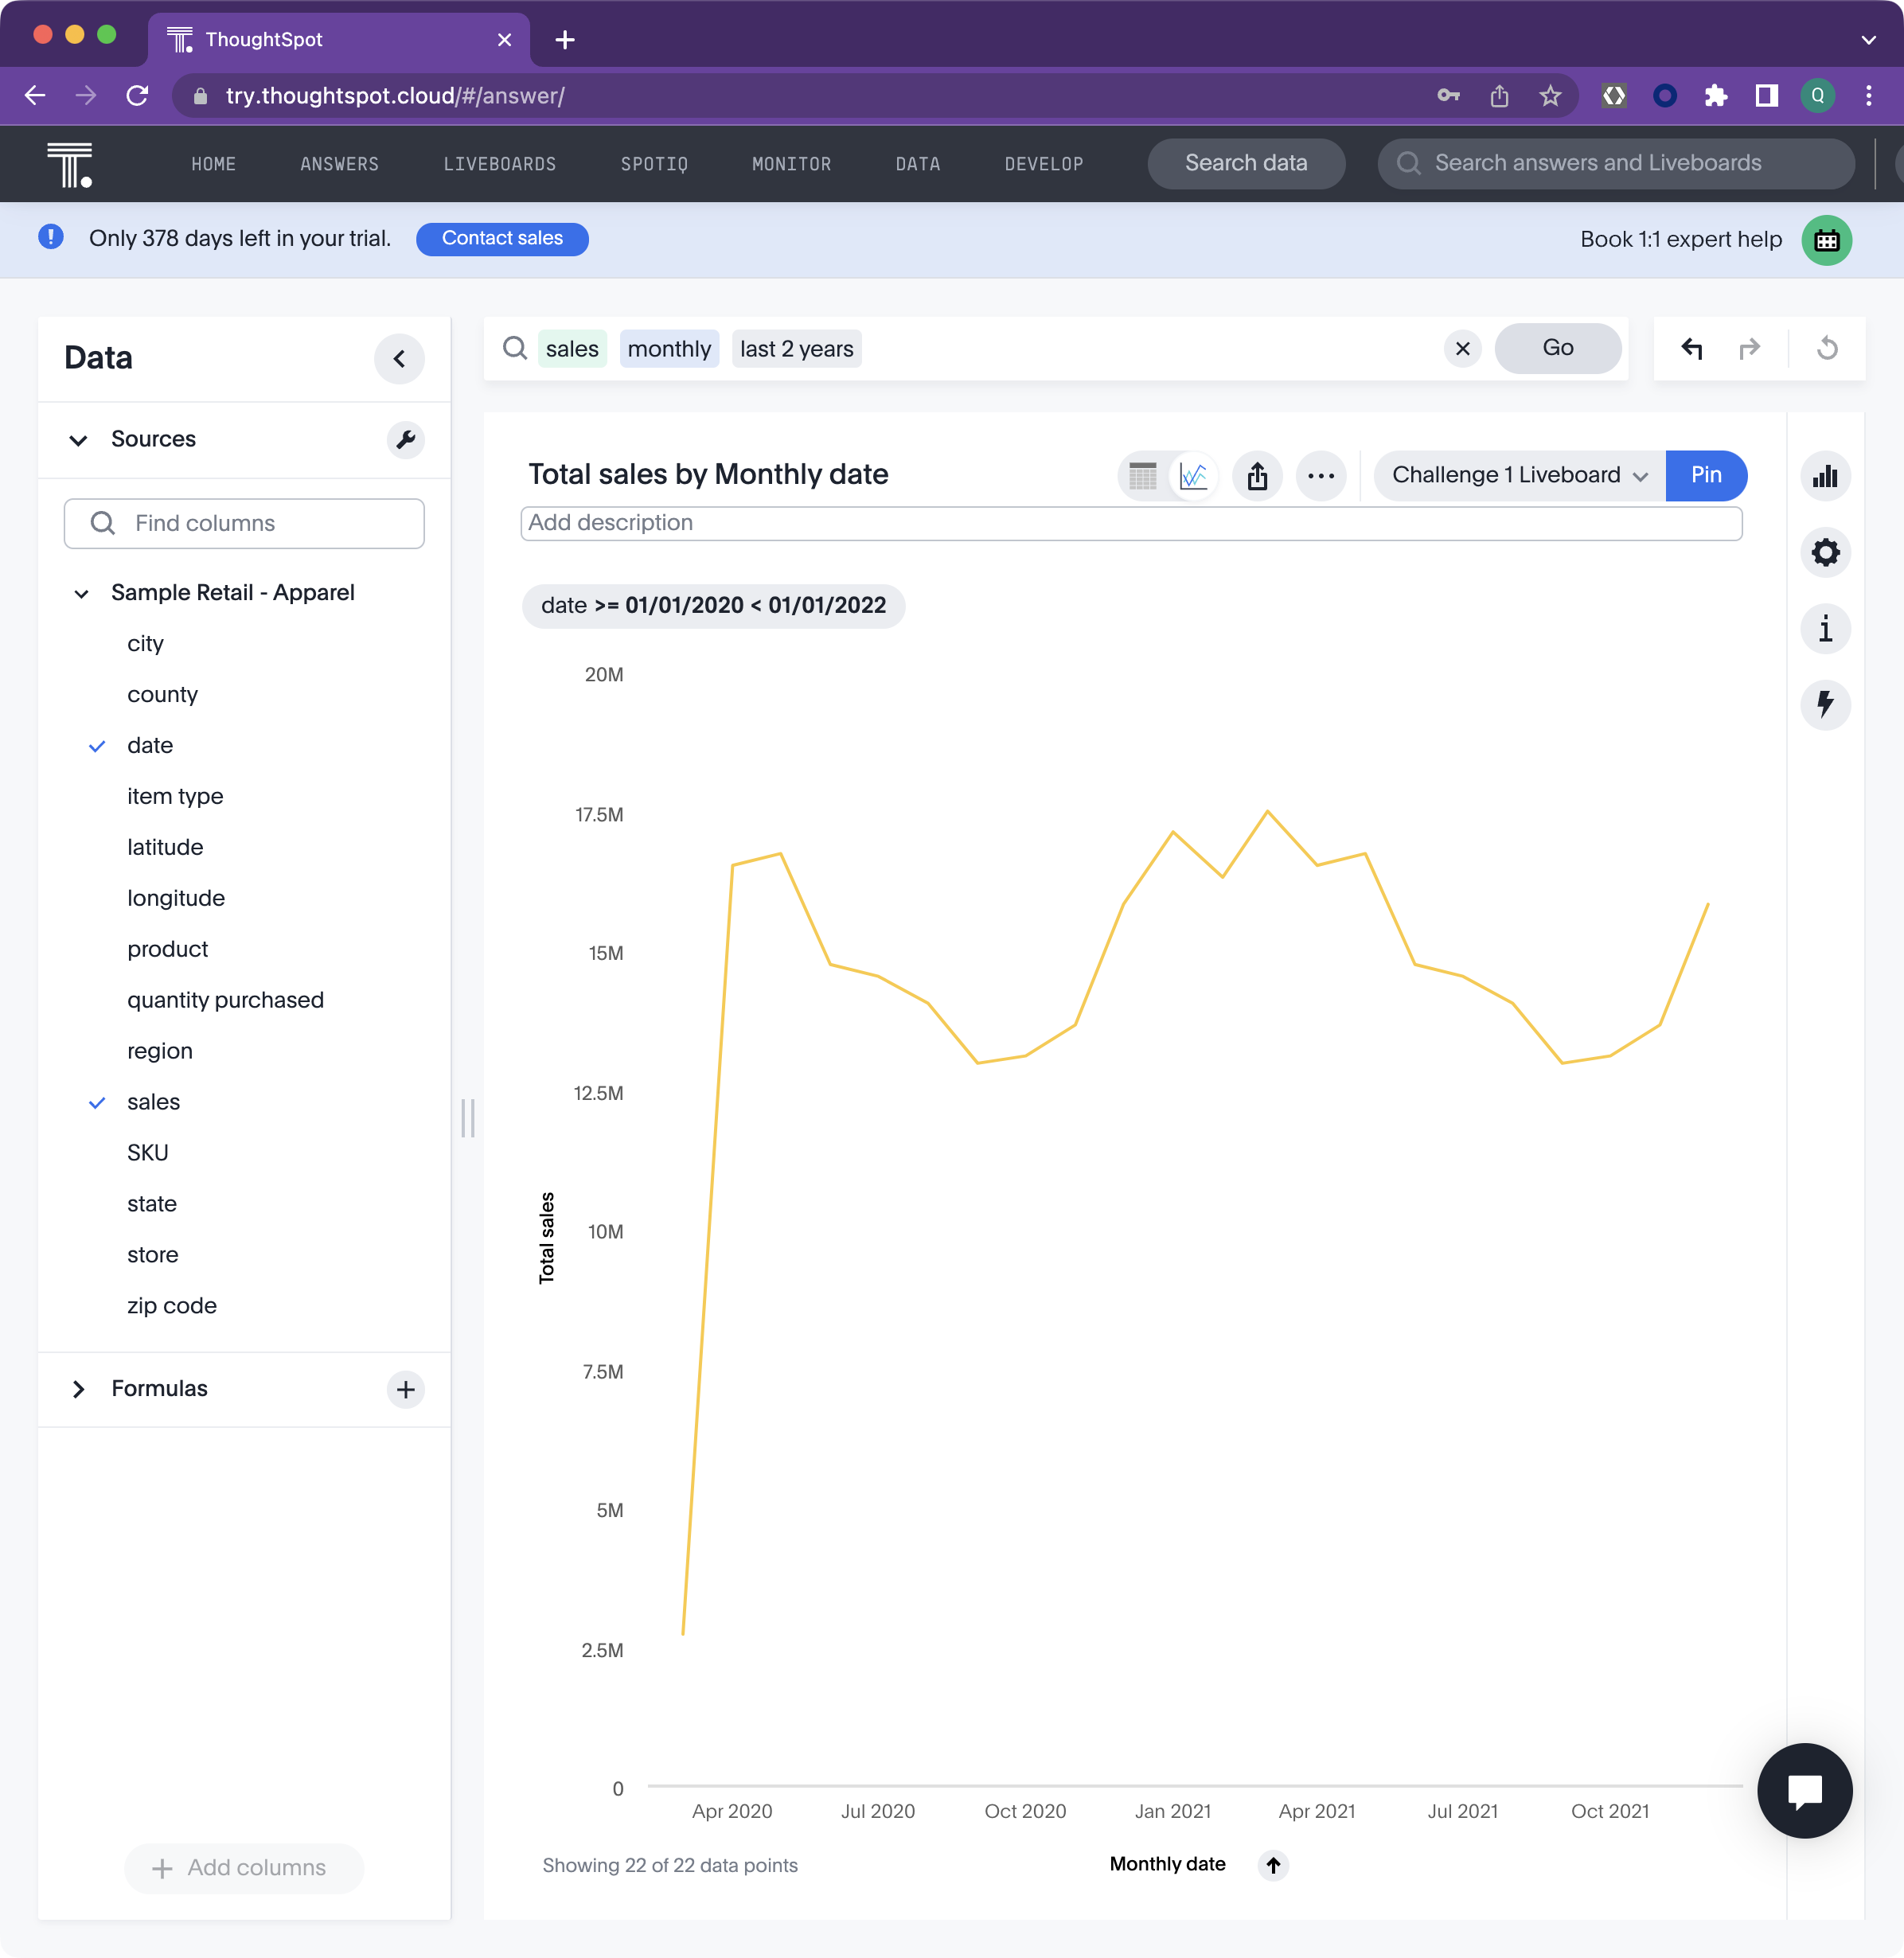
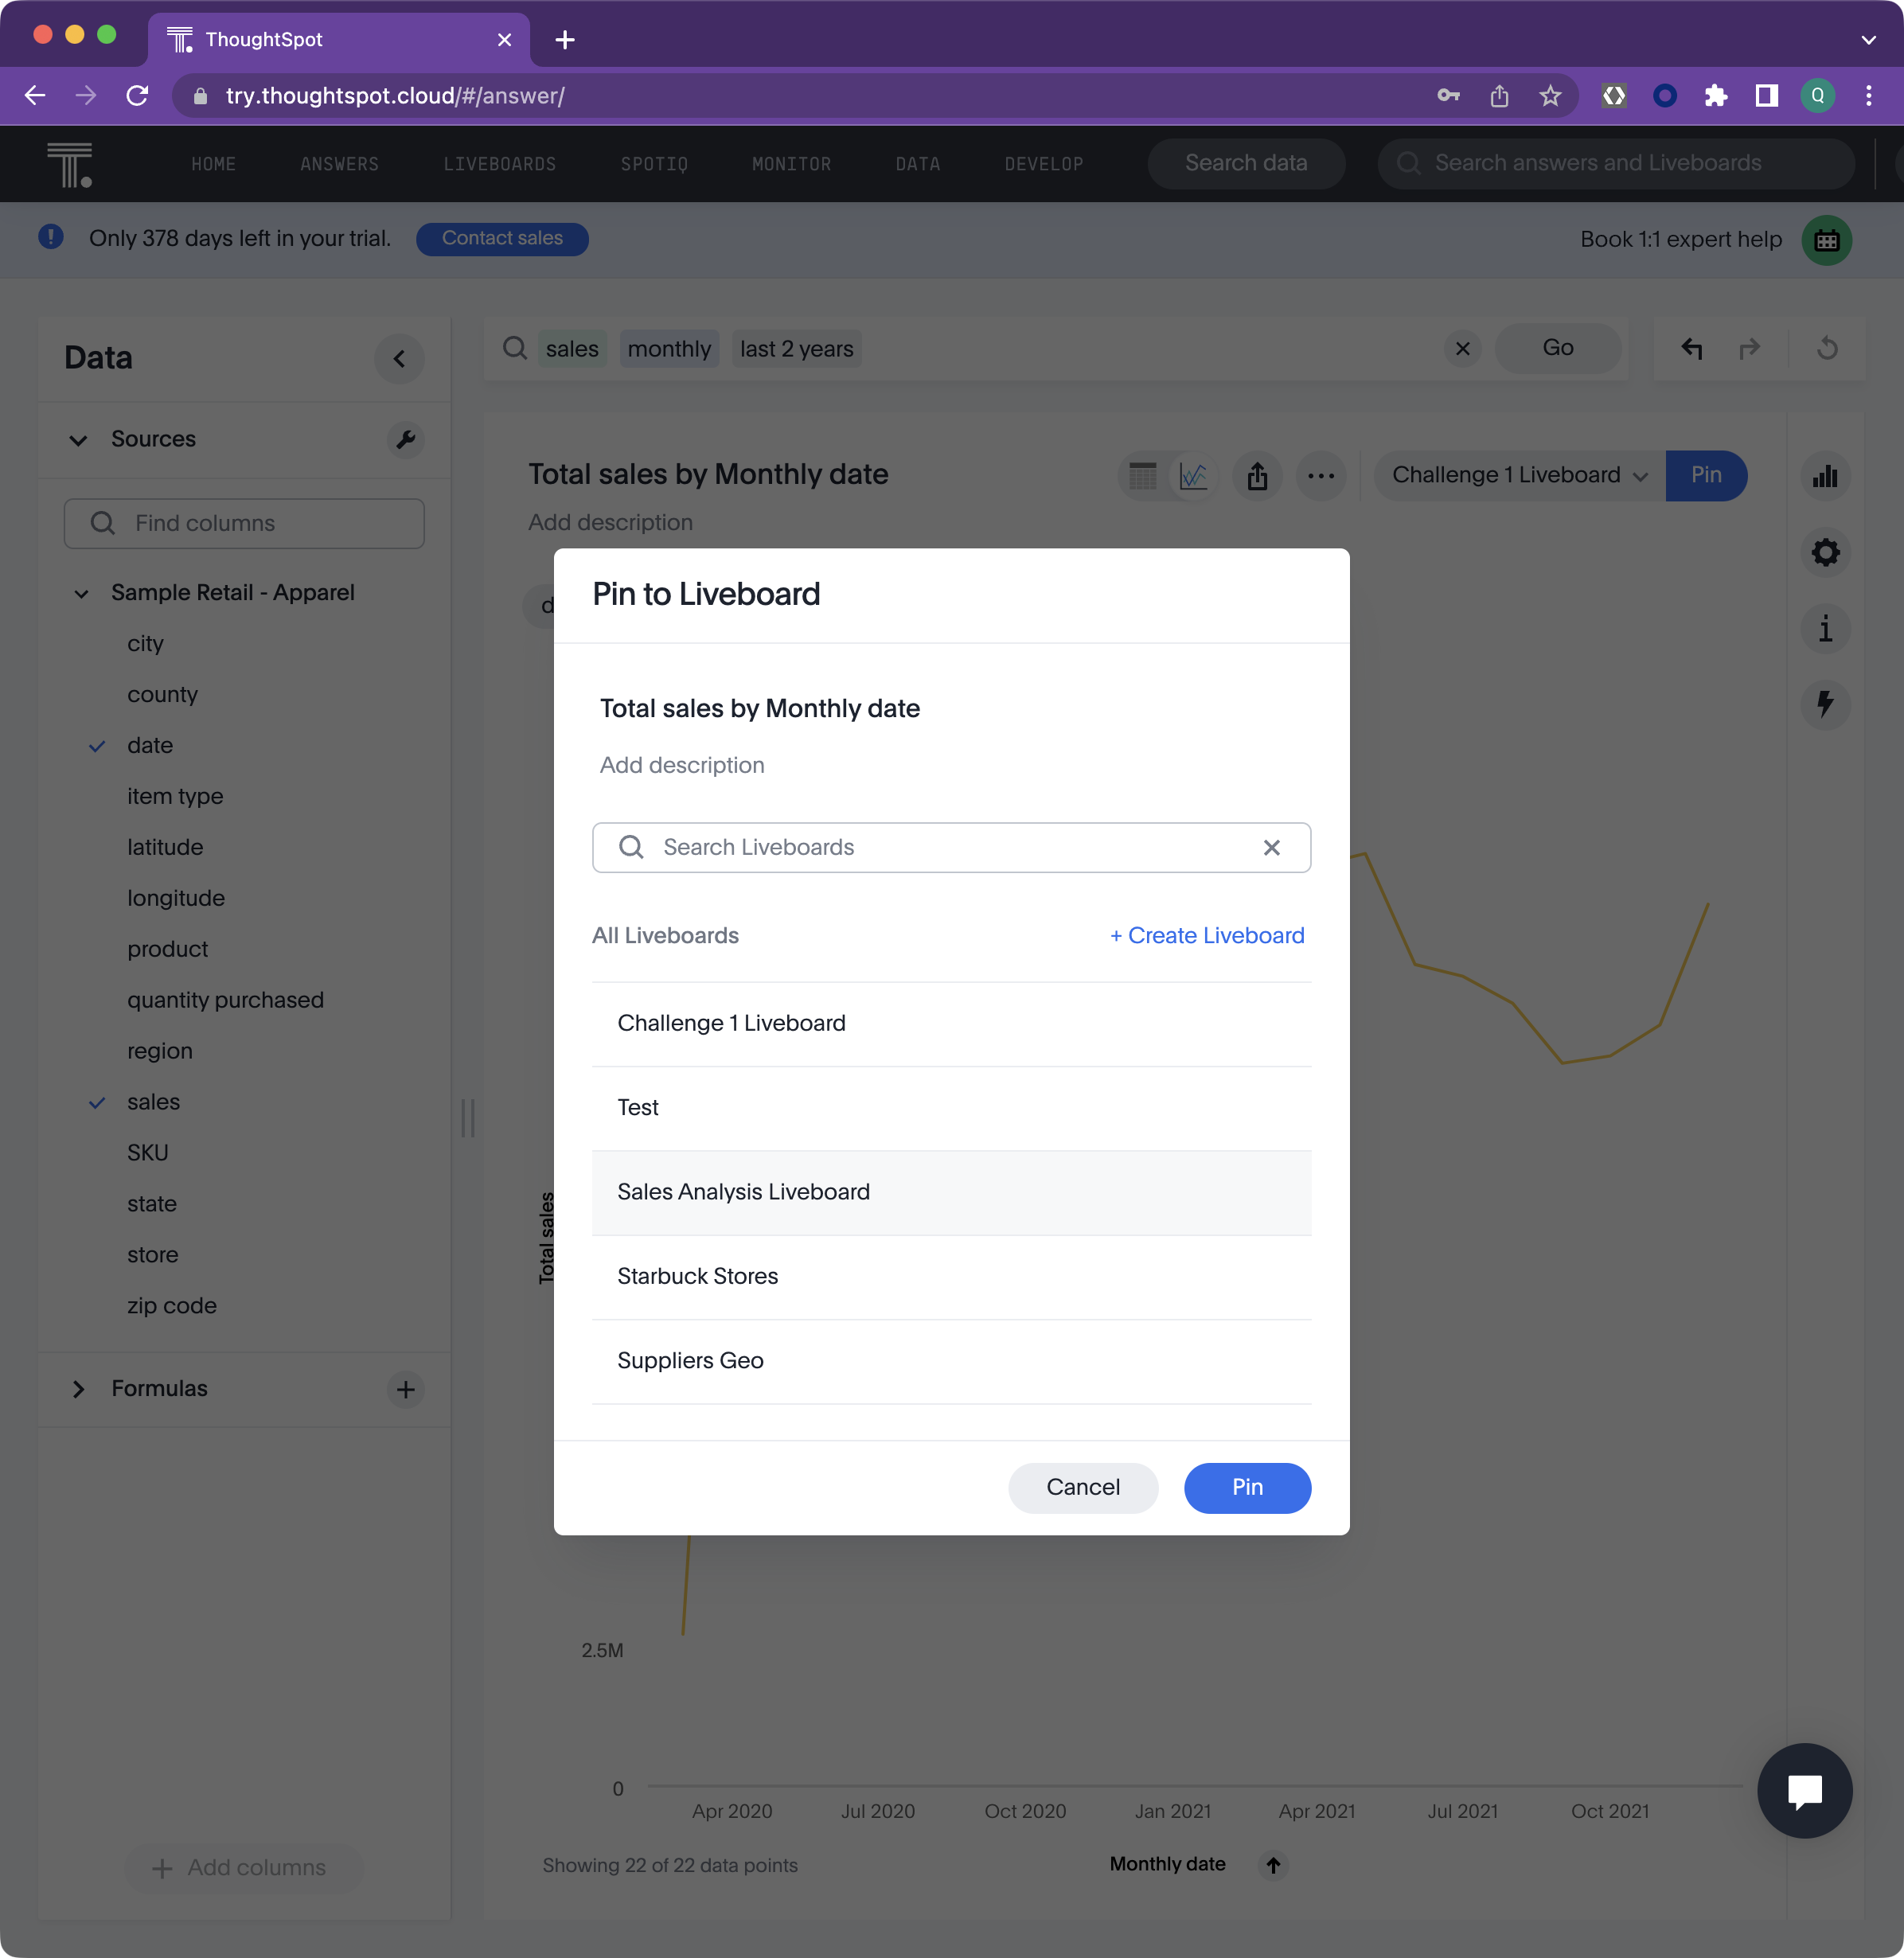
- Now Pin that answer to a new liveboard
- Select the Pin button on the top right of the visualization window.
- If prompted, select Create liveboard and enter "Sales Analysis Liveboard" (the word liveboard is not necessary. Only using for this illustration) and then select Pin (or the checkmark which is only shown the first time the liveboard is to be created).
Top 15 stores
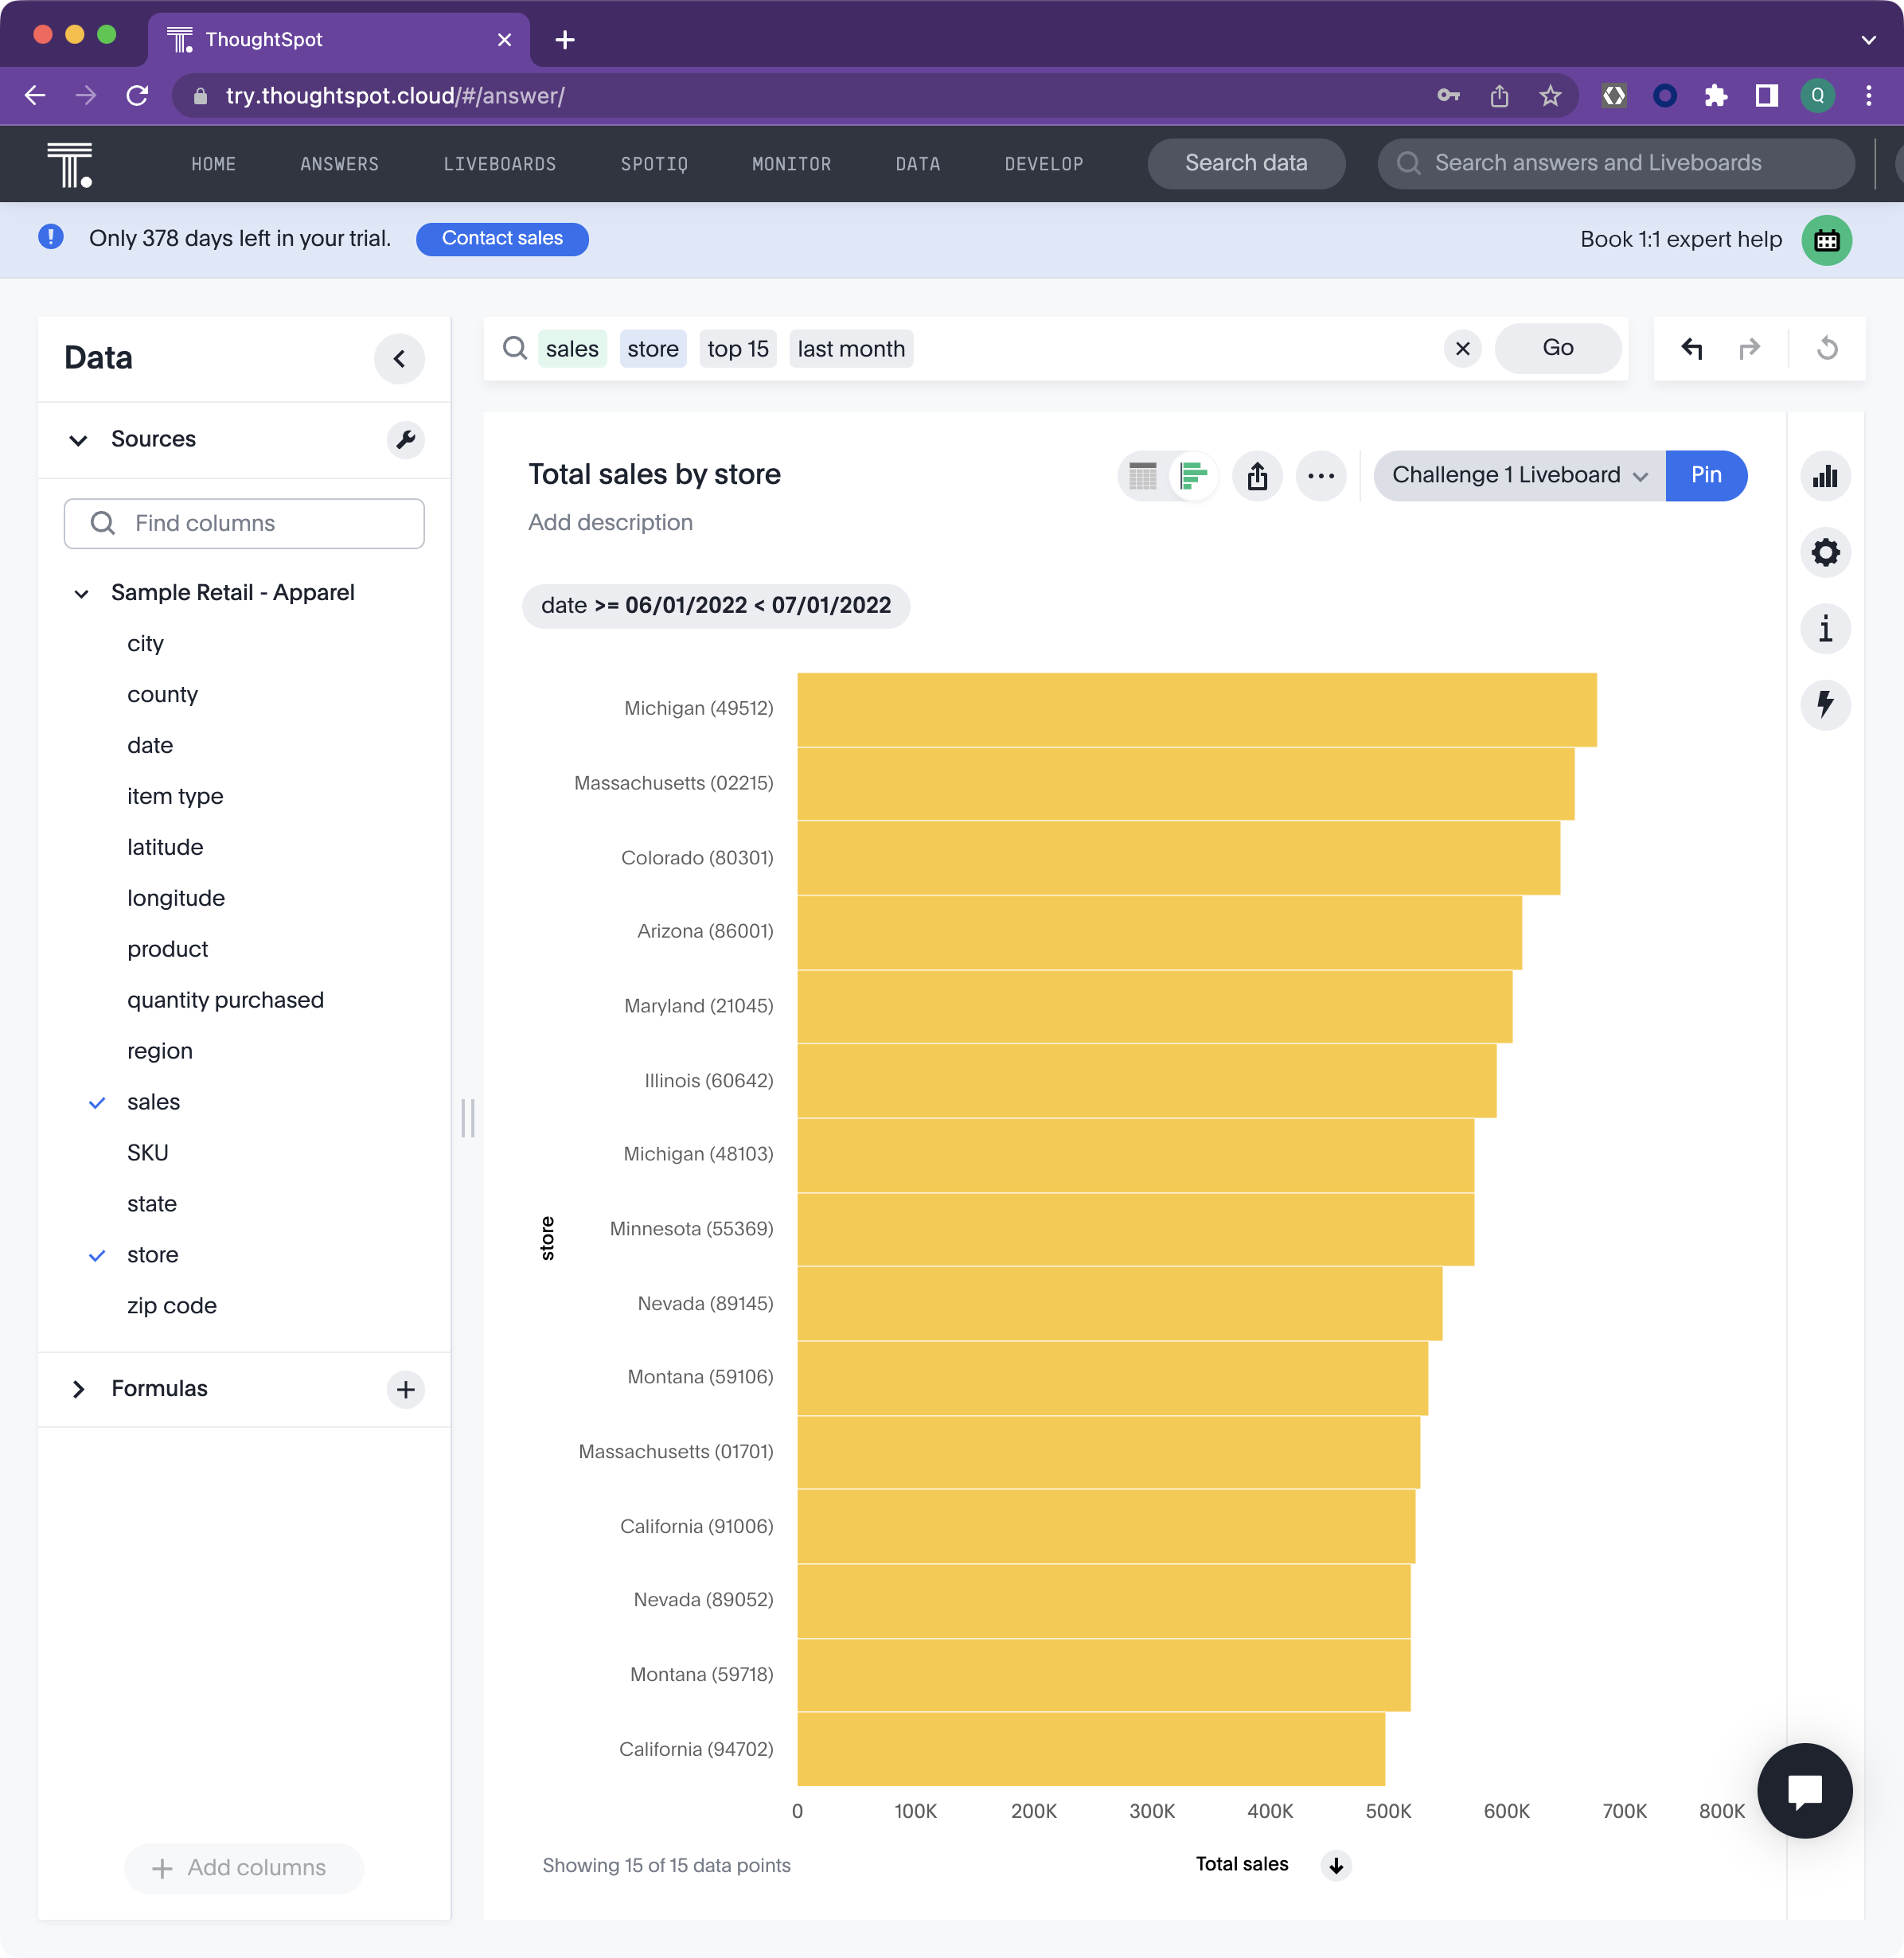
- Start a new Search by tapping Search Data. This time, you will search for the top 15 stores by their sales for last month.
- Enter in the search bar: Sales Store Top 15 Last month
- Then press Enter, Select Go, or click below the search bar to launch the query. While you can change the chart time, keep this one for now.
Note the top 15 include stores from all over the USA. You will see how run time filters will be applied later to focus on the top 15 in a particular region as an example.
- Pin the answer to the liveboard you created previously.
- Save the search by tapping the ... and calling it Top 15 last month, then select the Pin action, select the Sales Analysis Liveboard and finally select Pin (at the bottom of the Pin to Liveboard window) to add it.
- View your liveboard. Select LIVEBOARDS on the ThoughtSpot top navbar, select Sales Analysis Liveboard to open it.

Congratulations. You now have a liveboard with 2 search answers and are ready to embed it in the ThoughtSpot Everywhere Developer Playground.
Now that you have your answers and liveboards created, it is time to take advantage of the Developer Playground. The Developer Playground is a visual tool to help to build, test, and iterate on embedded components, prior to adding to your webapp. Unlike traditional approaches to development which require you to read documentation to piece together supported attributes, and configure local environments just to test your solution, the Developer Playground let's you quickly build your embed solution with confidence, greatly reducing time-to-market and avoid syntactical errors.
- Select DEVELOP on the ThoughtSpot top navbar to open the Developer playground.
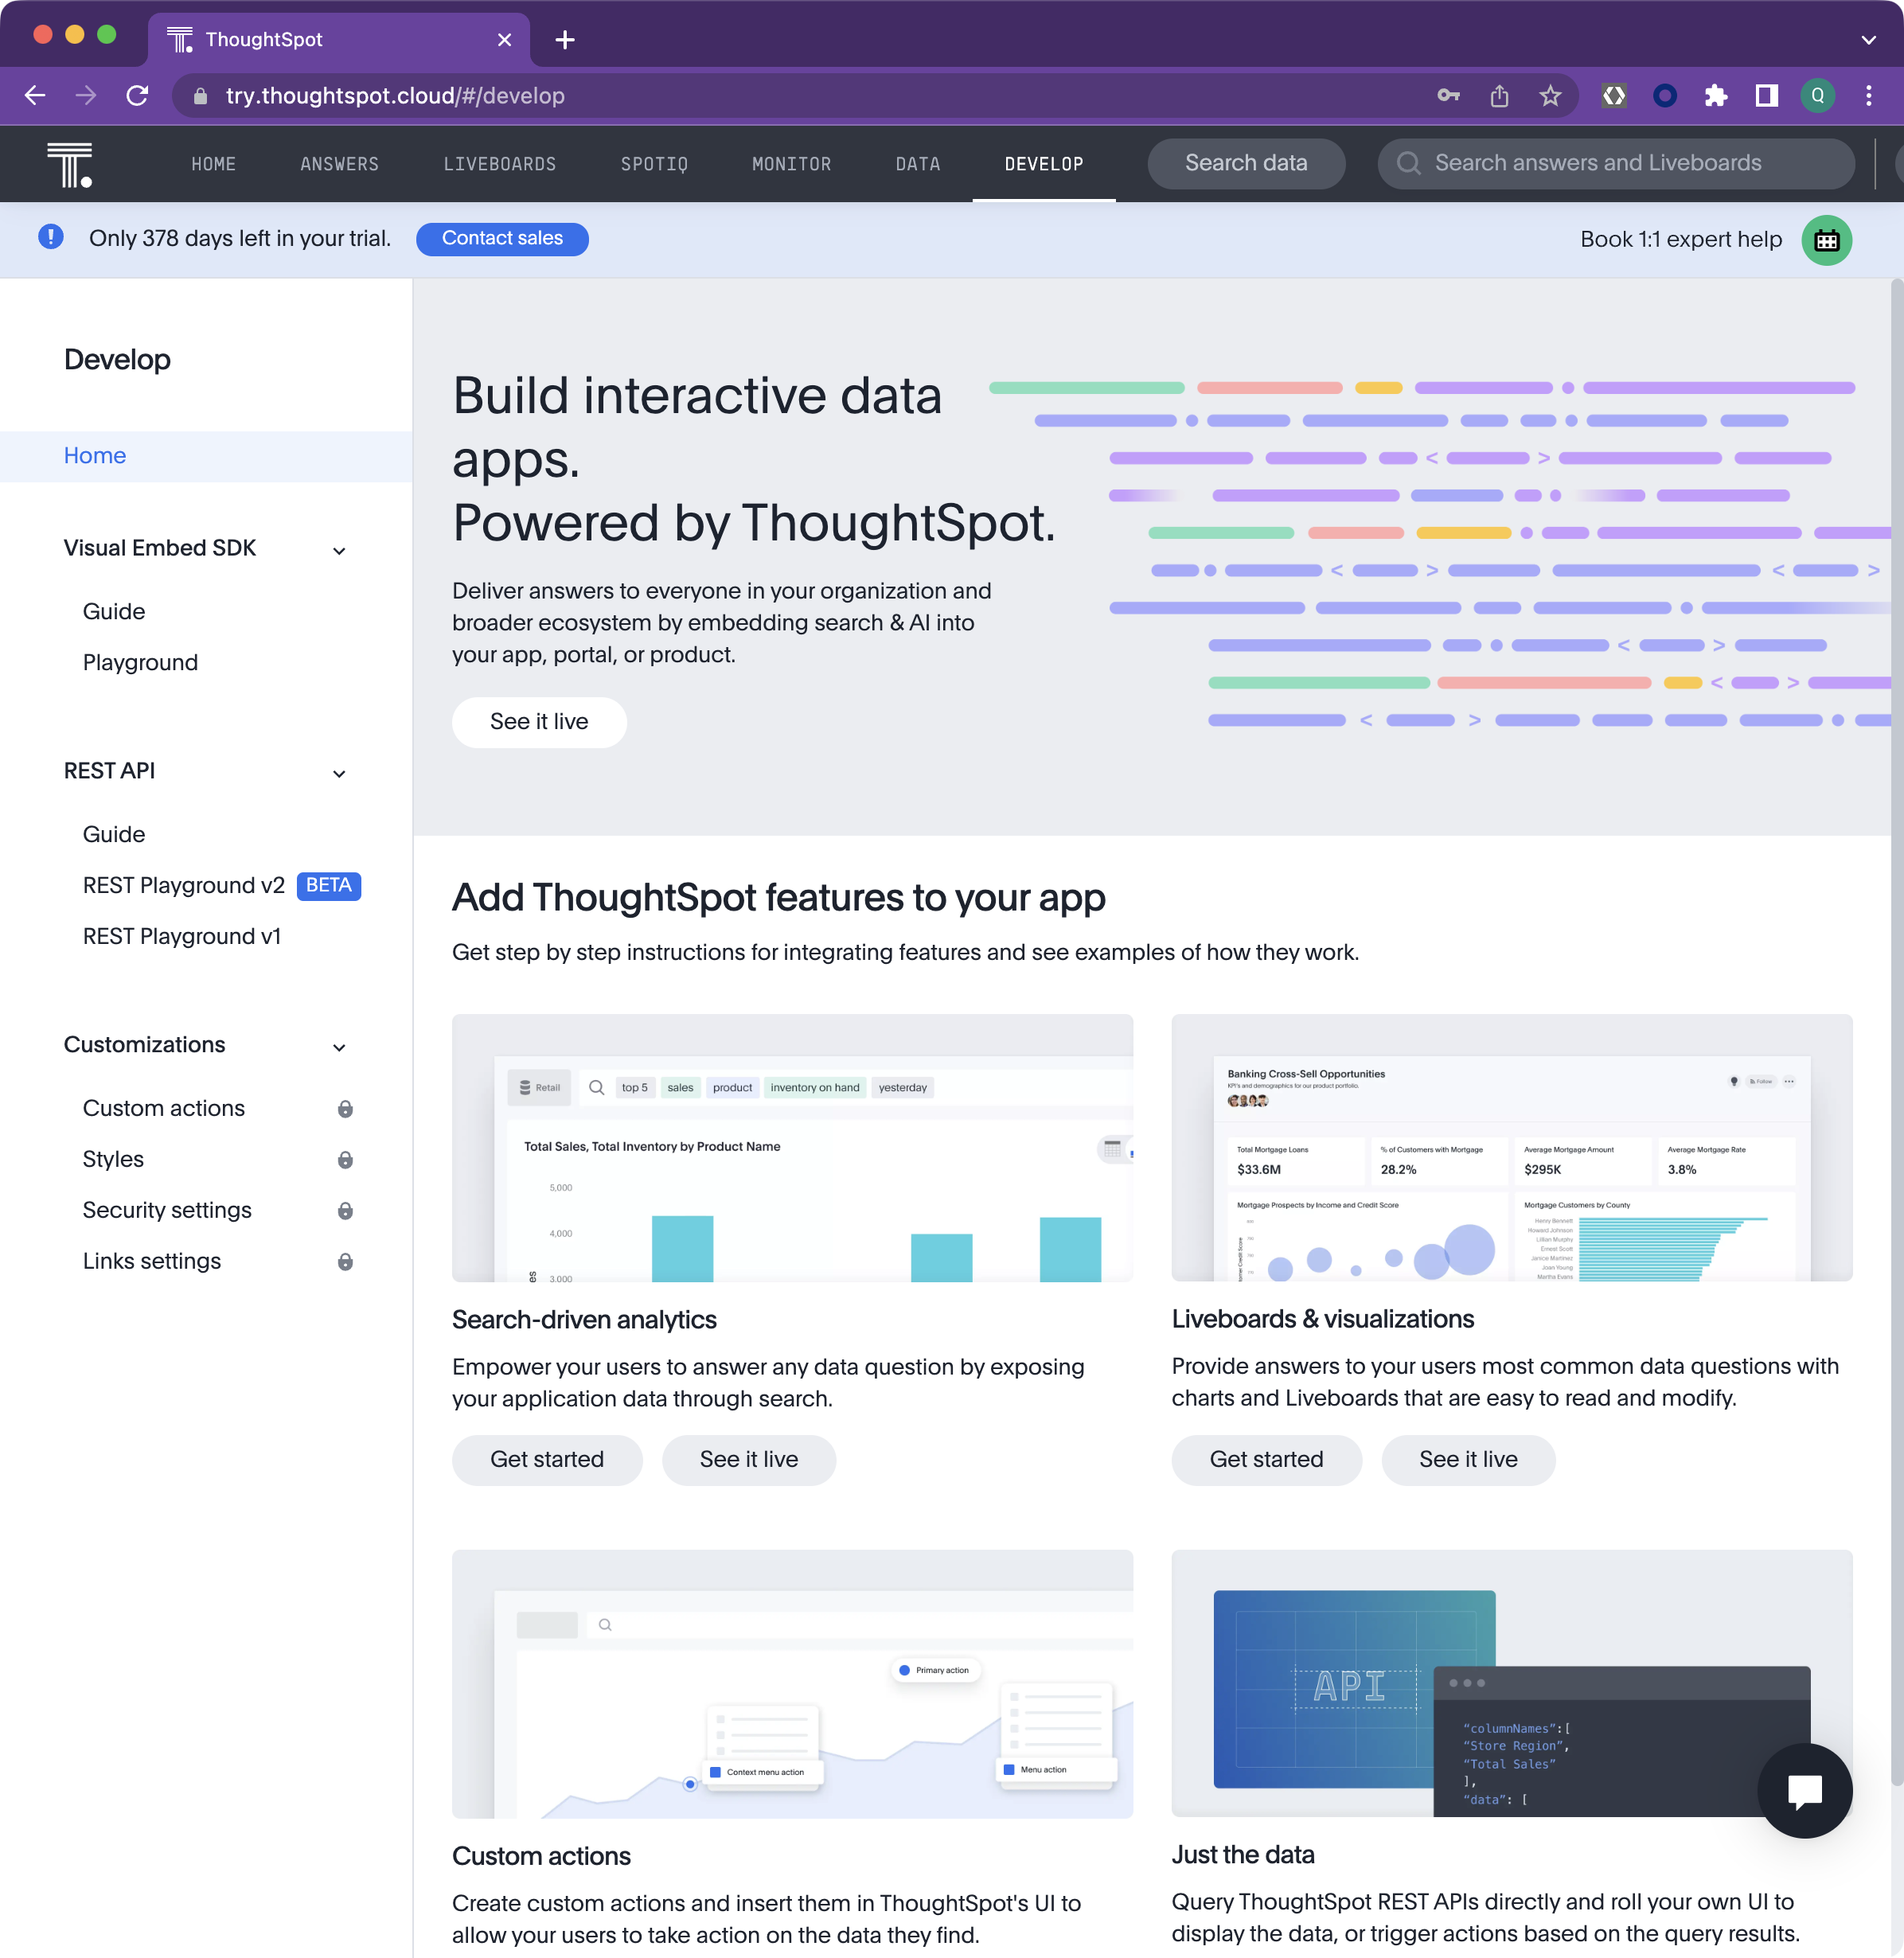
The Develop area contains 4 sections: Home, Guide, Playground, Customizations.
- Home provides immediate access to overview, 3 methods for embedding Search, Visualizations, and Pinboards, plus 1 method for accessing data via API where you then control how you want to visualize it.
- Guide provides quick access to all of the visual embed commands and Rest API calls.
- Playground provides a cloud-based sandbox environment to generate and test code needed to embed the ThoughtSpot Search experience, Visualizations/Liveboards that you or others on your team create, and the Full ThoughtSpot App (white labeling).
- Customizations provide access to creating custom Actions that can invoke a URL or trigger a callback in your parent application, changing the Styles (look and feel) for app, visualizations, and white labeling, establish Security Settings to configure automatic authentication and query data programmatically with the REST API.Note: Customizations are only available in the paid version of ThoughtSpot and not the free trial.
Embed a Liveboard
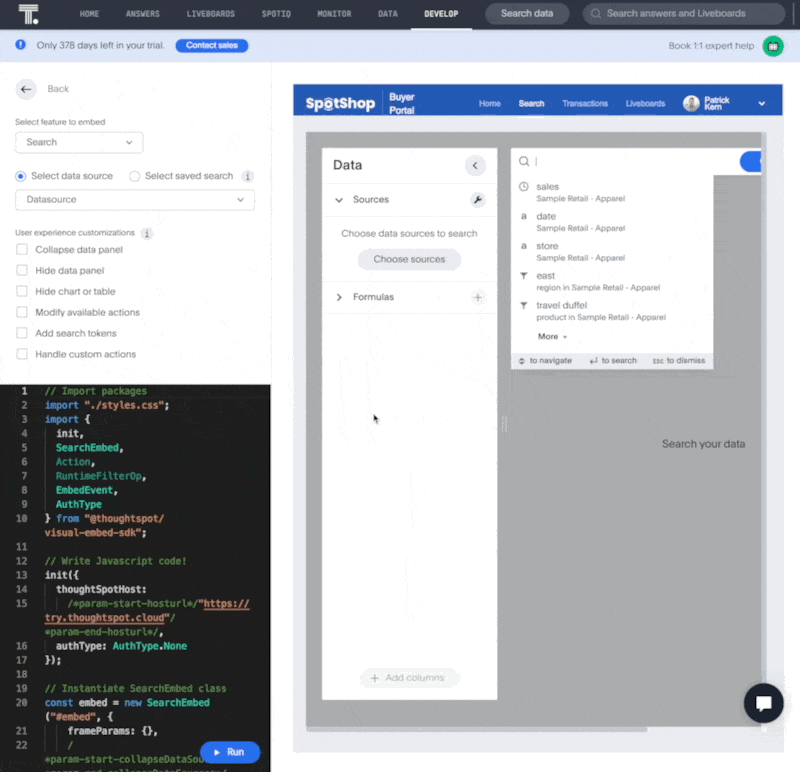
Begin the playground experience by embedding the liveboard you created into the sample data app sandbox provided within the Developer Playground .
- Select Liveboard from the Playground menu.
If this is your first time doing this, a Start tour option is shown which will guide you through the steps to select and embed the ThoughtSpot object. For now, select No Thanks. Use the Start Tour button on the nav bar to revisit any time in free trial.
- The ‘Select feature to embed' is already set to Liveboard, select your pinboard and run to view it in the sample app
- Select your Liveboard "Sales Analysis Liveboard" from the drop-down selection menu and notice that upon choosing the liveboard, the code window on the bottom left automatically highlights the code that you would copy/paste directly into your data app.
- Select ‘ Run to render it in the sample SpotShop data app window.
Modify available actions
There are many actions that can be disabled or hidden for example and all are documented in the Visual Embed guide accessible from the Develop page.
- First, look at the default actions available for a particular embedded component such as a Search or Liveboard item.
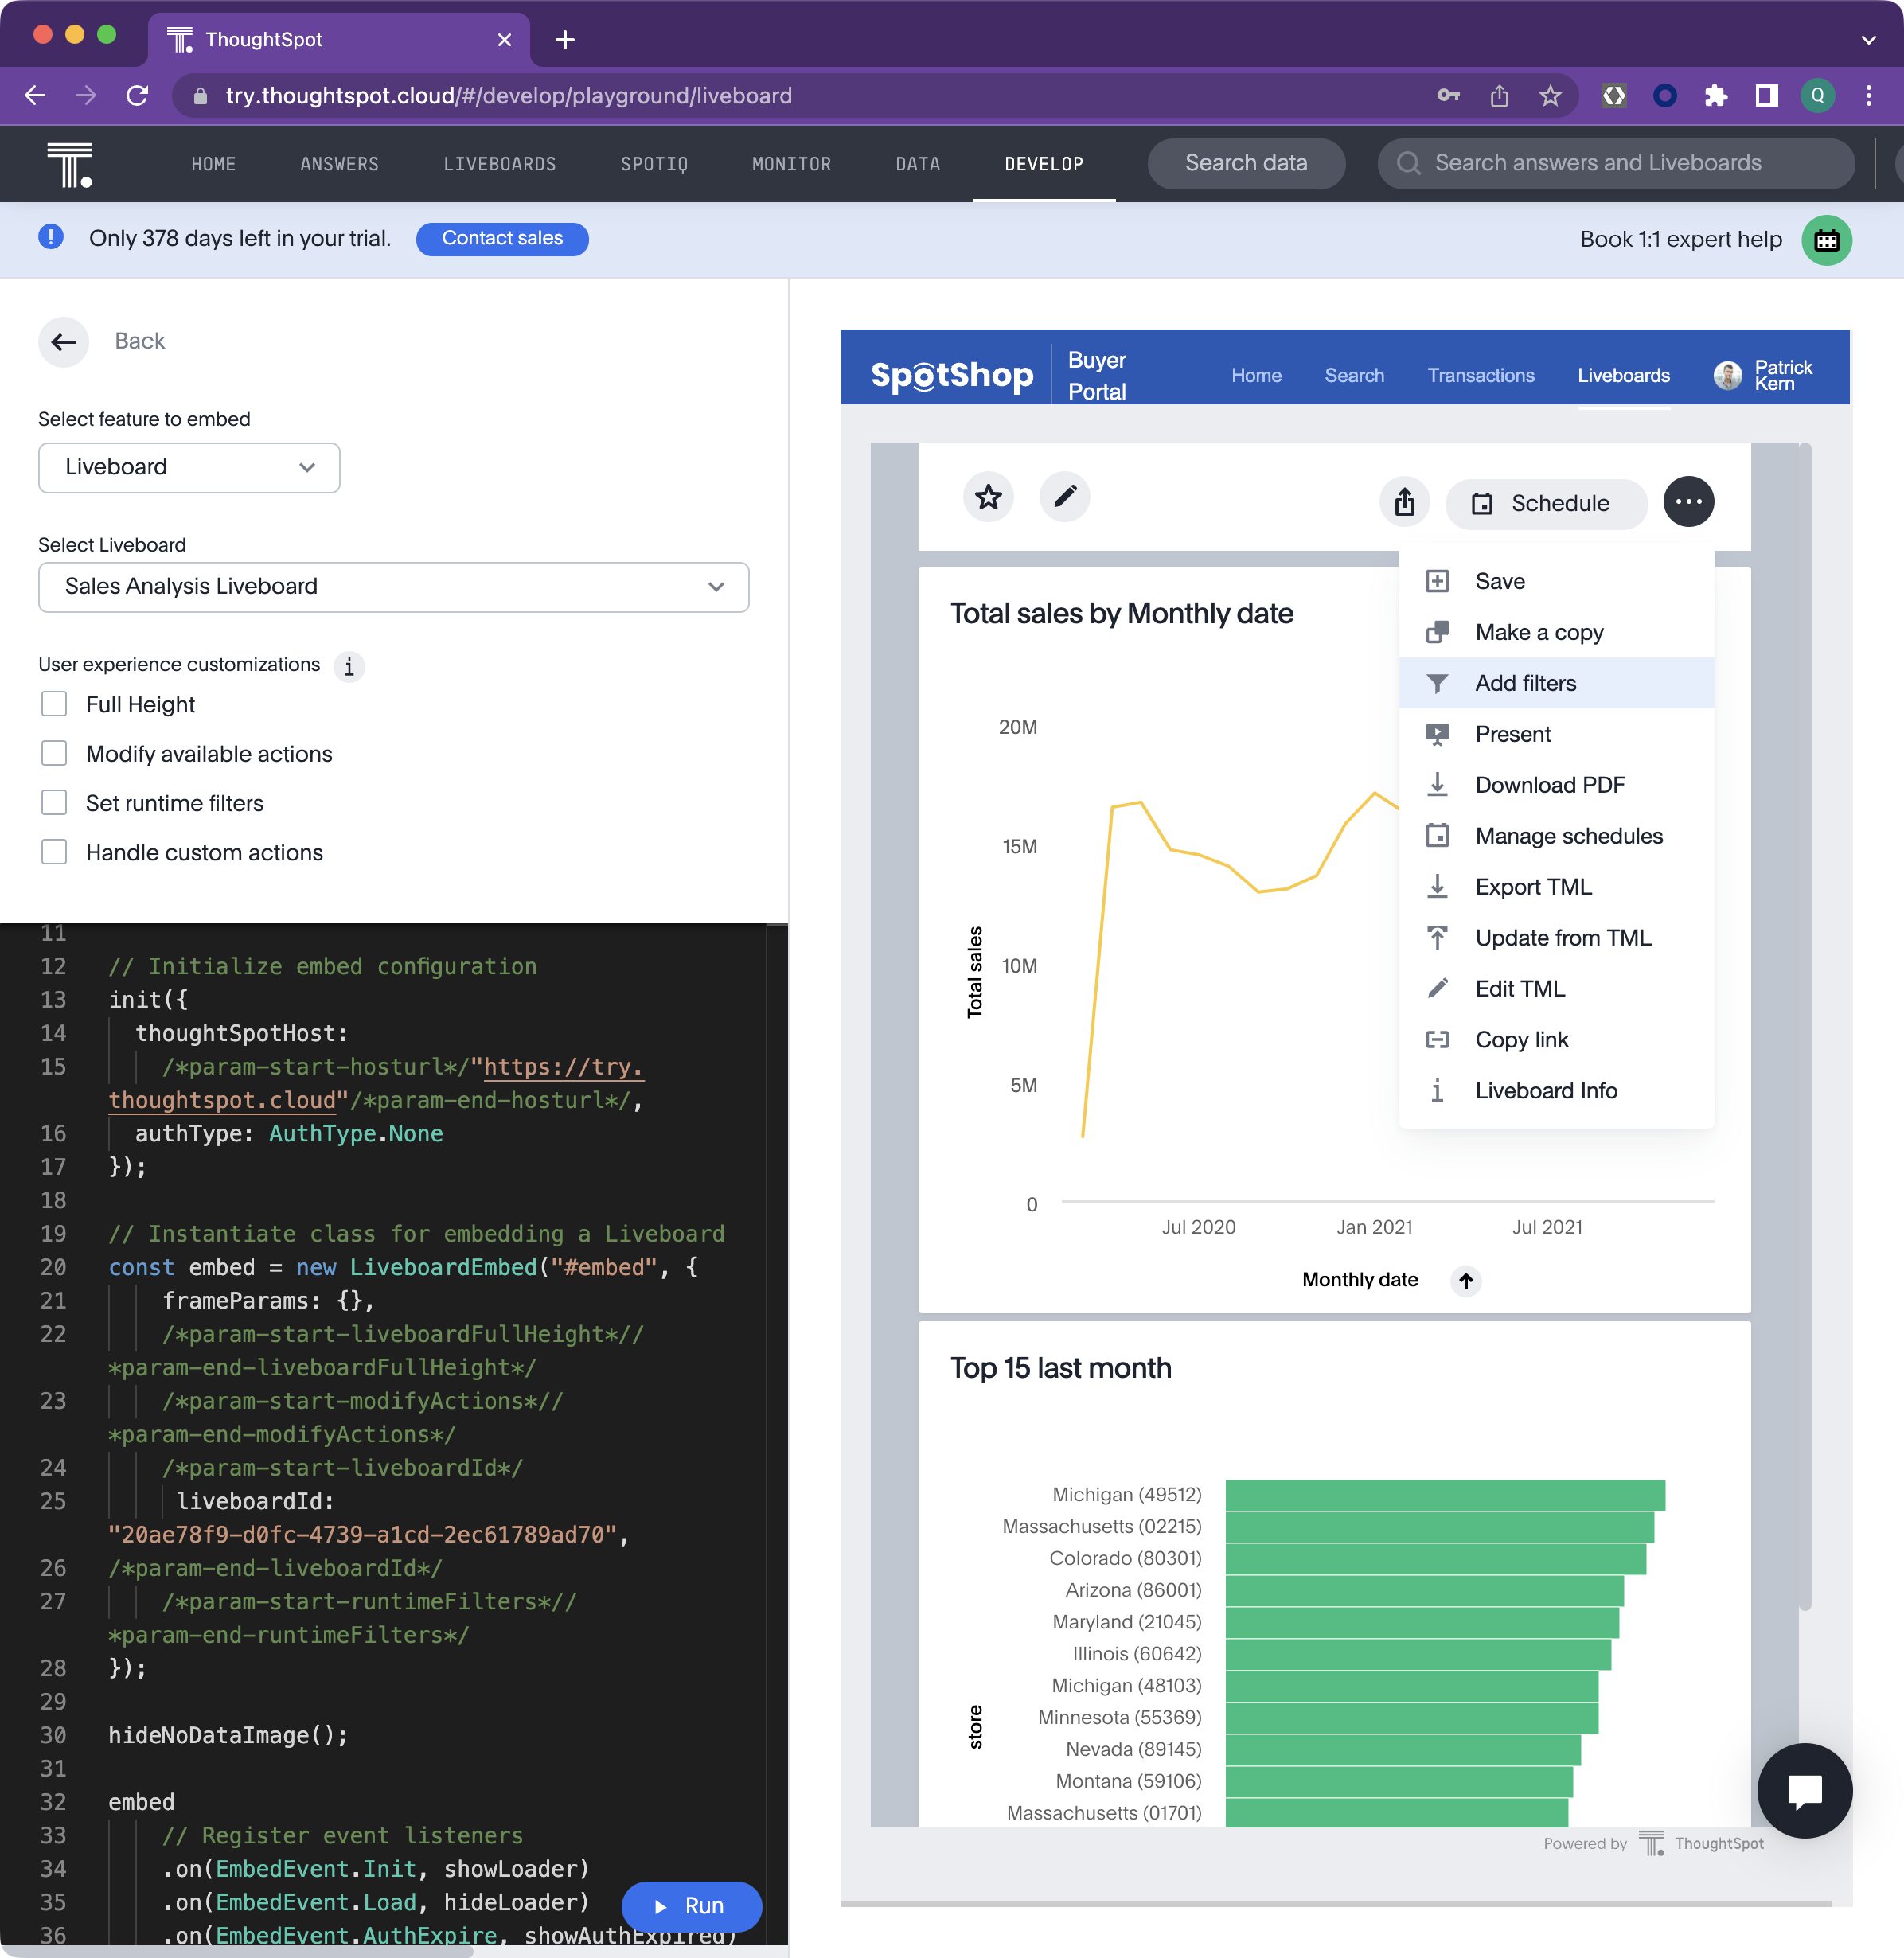
- Whilst still in the developer playground, make sure you have the Sales Analysis Liveboard, then select the Modify available actions checkbox. This will add a code snippet into the editor section.
- Enter "Action.Save" inside the "[]" for the
disabledActionssetting. - Change the "Reason for disabling" to "Premium action, request upgrade." for the
disabledActionReason - Enter "Action.MakeACopy,Action.DownloadAsPdf,Action.AddFilter" inside the "[]" for the
hiddenActionssetting. - Select ‘ Run to render the changes.
- Select the pinboard menu "..." to view the results.
- Hover over Save to see the reason. Notice the other actions specified above are hidden.
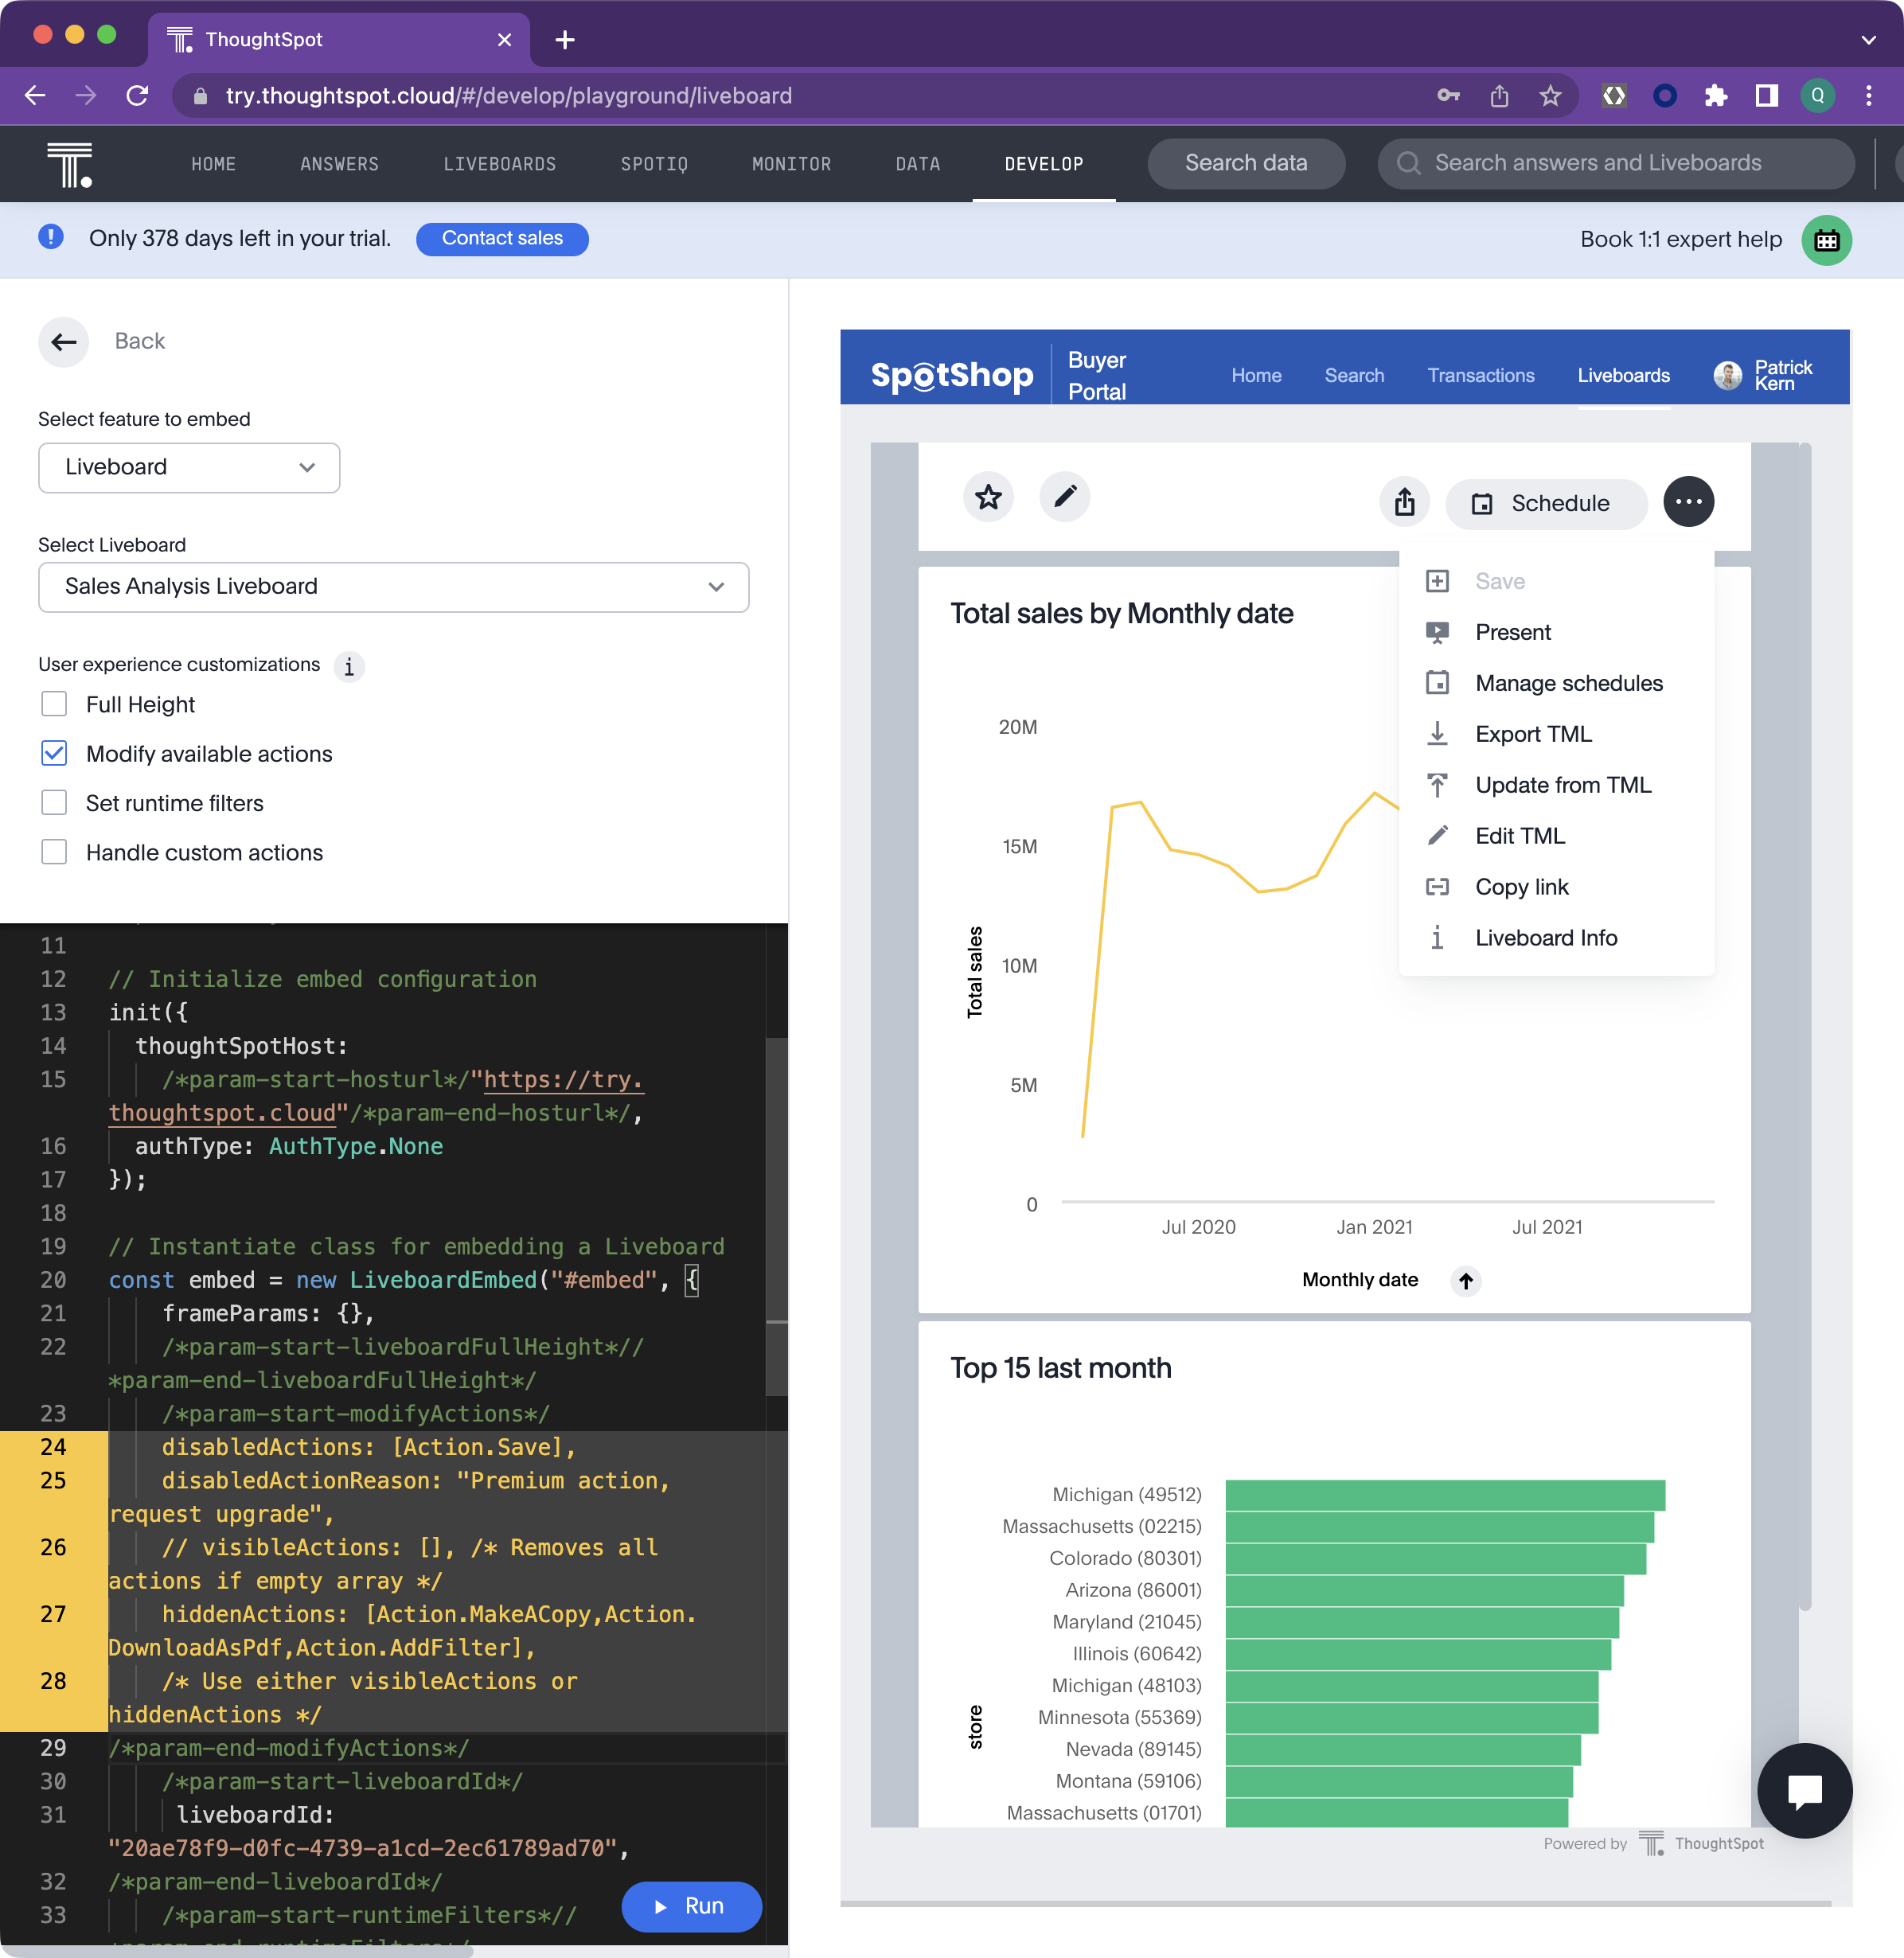
You have successfully applied modified actions.
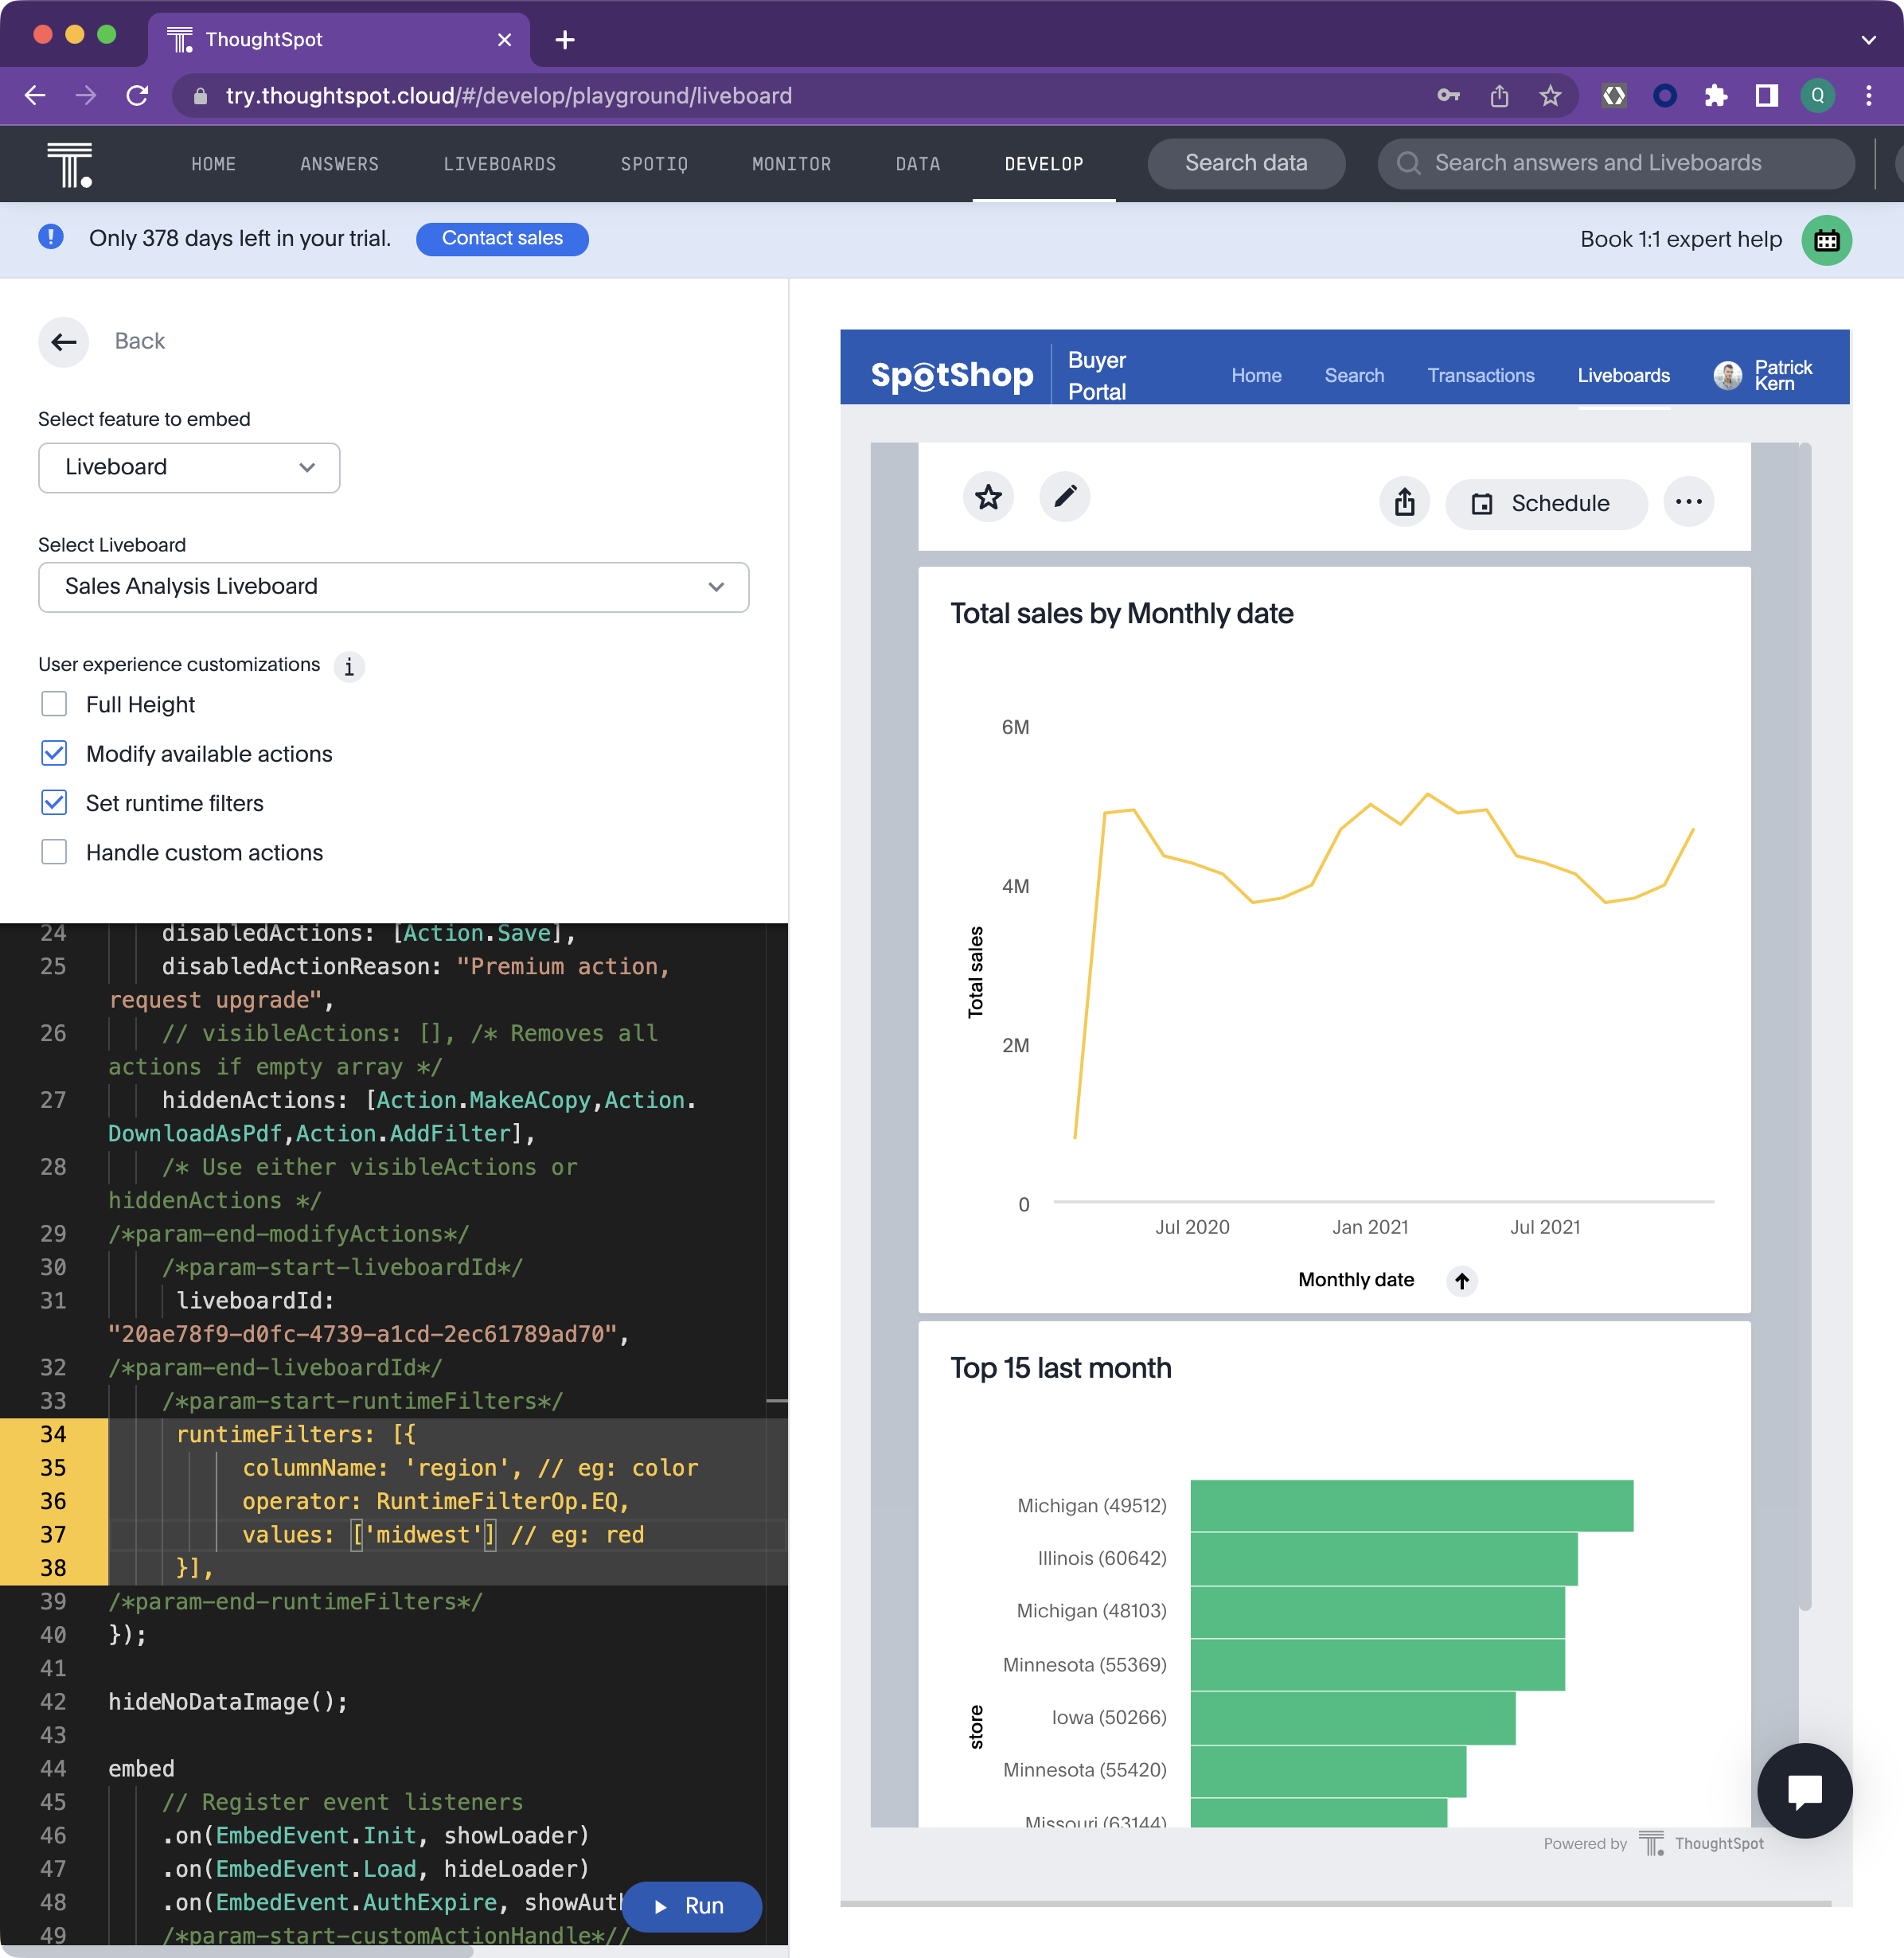
Set runtime filters
Applying run time filters provides additional controls on who can see what data. You may opt for forcing a particular filter based upon the user's role for example, or perhaps you would like to present filter choices in your own data app nav bar and push the selected values that the user selects.
- The current liveboard, Sales Analysis Liveboards, includes the Total Sales by Store chart. This shows the top 15 stores for all regions. You will apply a run time filter to set the region to Midwest so the top 15 is now only for the stores in the Midwest region.
- Select Set runtime filters under User experience customizations in the playground left pane. Notice the code window again, highlighting the code to be affected.
- Change columnName1 to ‘region' and value1 to ‘midwest'
- Select Run to render the changes.
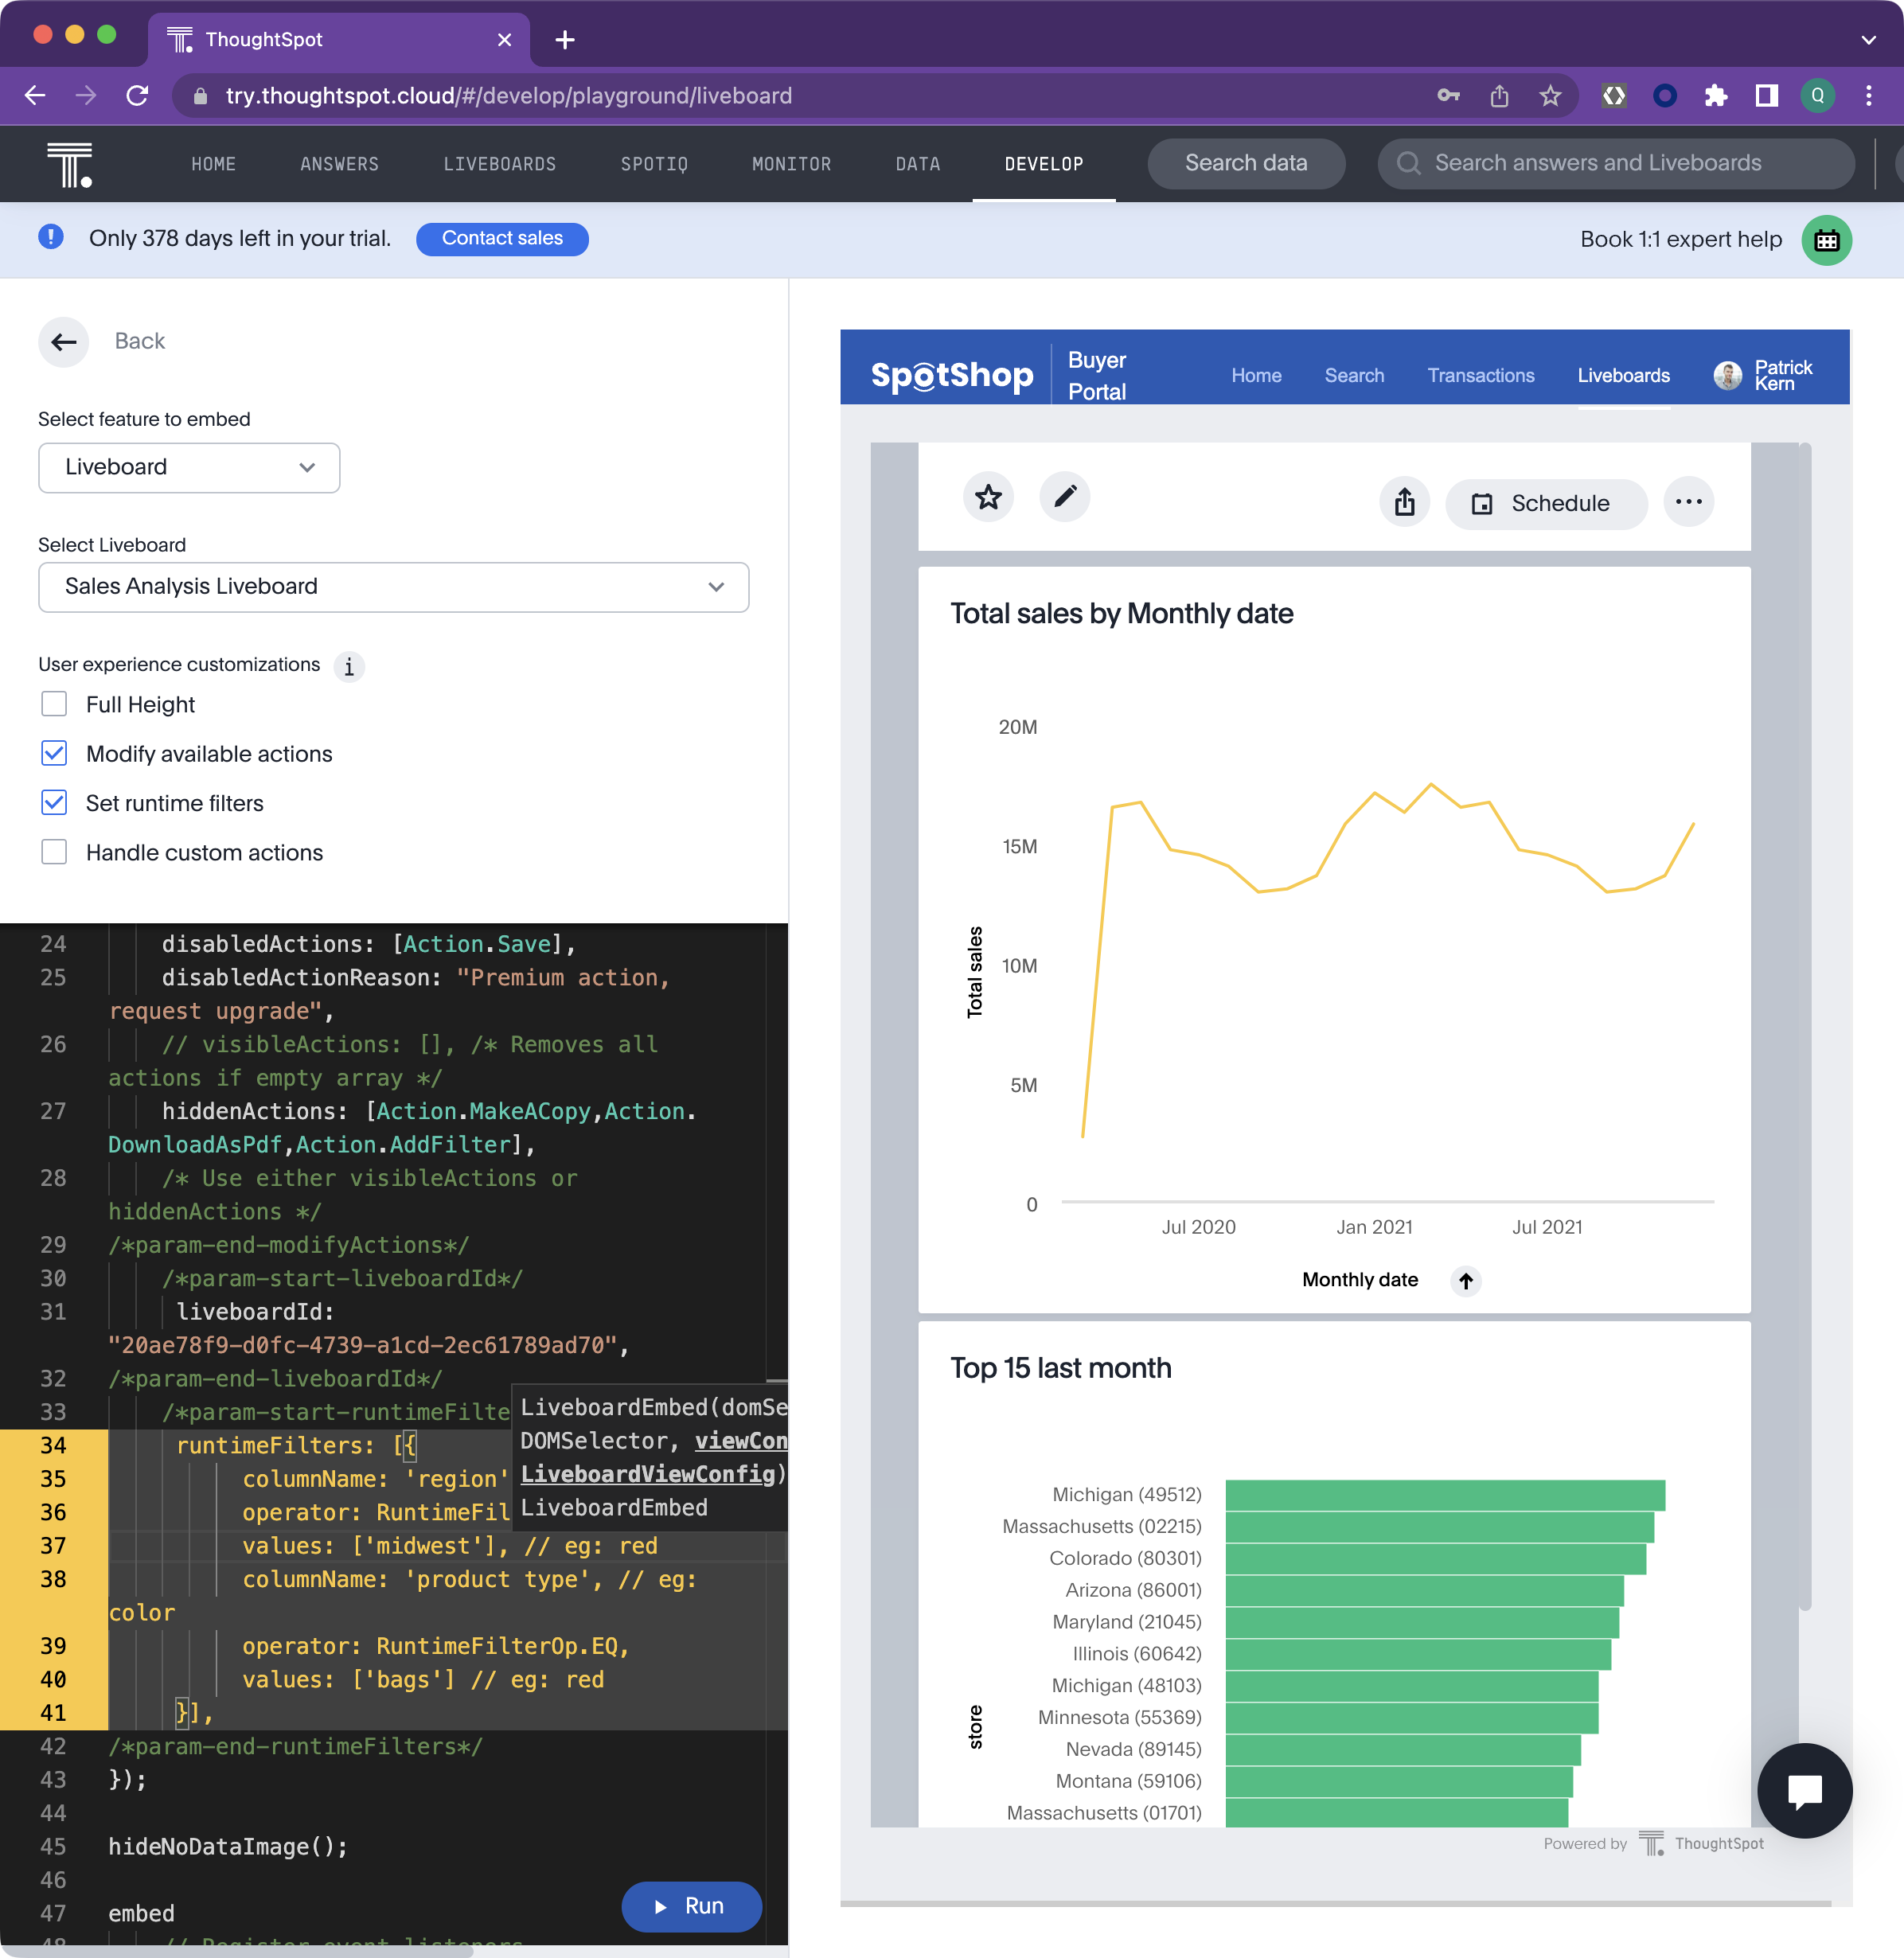
You can also add multiple runtime filters. Let's add one more filter to show only the data for bags. .
- Copy the runtime filter code and paste it below the existing entry. Make sure you add an additional comma directly after [‘midwest']
- Modify ‘region' in the 2nd run time filter to item type and change ‘midwest' to ‘bags'.
- Select ‘ Run to render the changes. Now data is filtered by the bags sold in the Midwest region.
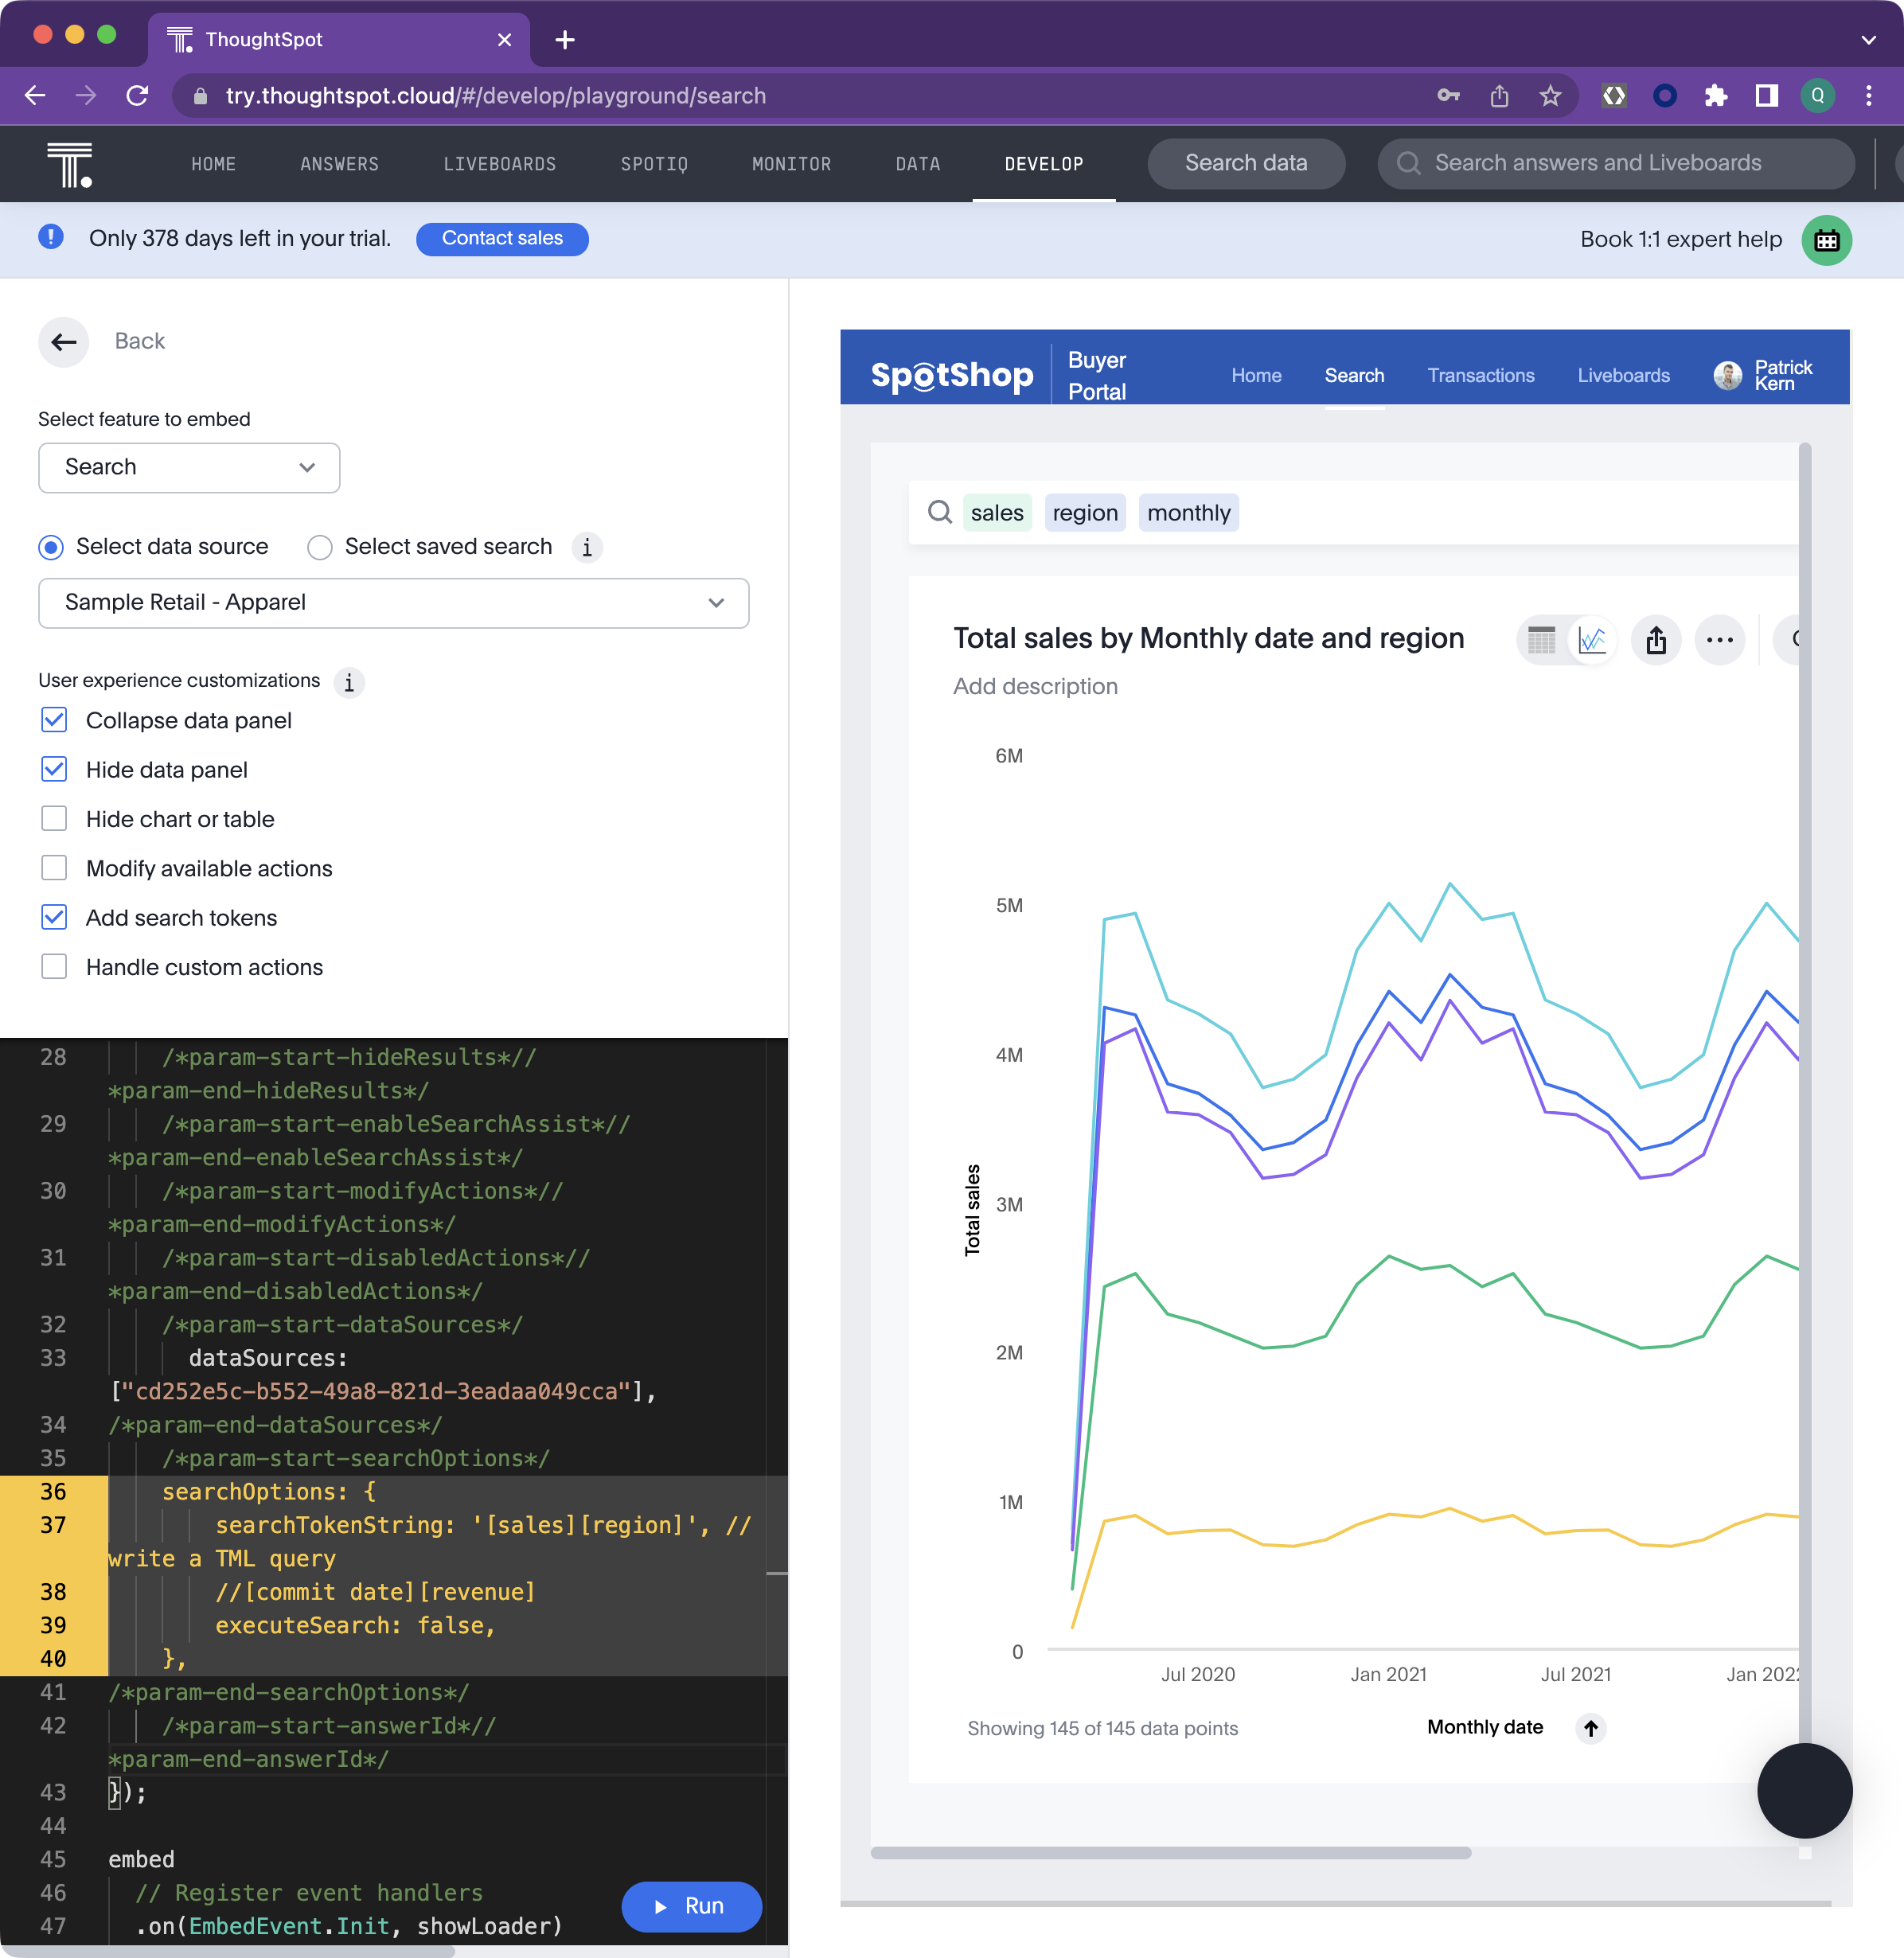
Embed a Search
Let's go ahead and use the Developer Playground to embed and customize a search component.
- The ‘Select feature to embed' to Search
- Select your datasource "Sample Retail - Apparel" from the drop-down selection menu and notice that upon choosing the datasource, the code window on the bottom left automatically highlights the code that you would copy/paste directly into your data app.
- Select ‘ Run to render it in the sample SpotShop data app window.
Note: Search suggestions will automatically appear in the search bar based upon what you did previously.
- Enter in the search bar: Sales Region Monthly
- Then press Enter, Select Go, or click below the search bar to launch the query. While you can change the chart time, keep this one for now.
Note
: As an option you may want to enter some starting search tokens like Sales Region and let the user add more before sending the live query to the cloud data warehouse. Do that in the next task.
There are three search related actions \[Collapse data panel, Hide data panel, Add search tokens\] shown below. You will apply all for this task to create a starting point search and allow the user add more and then initiate the search.
- Select Collapse data panel
- Select Hide data panel
- Select Add search tokens
- Make the following changes to add search tokens, turn off automatic search and test it.
- Enter "[sales] [region]" inside the ‘' (single quotes for the searchTokenString setting.
- Change the "true" to "false." for the executeSearch setting.
- Select ‘ Run to render the changes.
- Enter "Monthly" in the search bar and press Go to run the search and voila, user self-service!
Congratulations for making it to the end of Part 1. So far, we have created everything on-platform, using the low-code developer tools. In Part 2, you will build a webapp with a simple hamburger navigation. This app will be written in ReactJS, a very popular JavaScript framework, and use the Visual Embed SDK and ThoughtSpot React components to embed Search, Liveboards, and the full ThoughtSpot app into a webapp.
In part 2, you will build a ReactJS webapp with a simple hamburger navigation, and use the ThoughtSpot Visual Embed SDK to embed live analytics.
To make things easy, we will use CodeSandbox, a web based IDE and runtime environment for building web apps. Using CodeSandbox means we don't need to spend time configuring our local environment for React development. The good news is that ThoughtSpot Everywhere uses the languages and developer processes you already know and love. If you already have your local environment setup for React development, feel free to use that too.
Note: You can also follow along using the completed app running in CodeSandbox. This sandbox app is fully functional, but uses the componentid from another ThoughtSpot instance. To make it work for you, you can substitue your ids, or better still, follow along in the workshop and build it all yourself.
In your browser, go to codesandbox.io and tap the Create a Sandbox button on the top right of the page, then select the React template. This will create a very simple web app, with code on the left, and rendered page on the right. Next, we have to add a few dependencies to our project. Be cafeful to add the correct library as there are a a few similarly named libraries to the ones we need.
- ThoughtSpot Visual Embed SDK
- Type @thoughtspot into the dependency pane, then select the
Visual Embed SDKfrom the autocomplete dropdown.
- Type @thoughtspot into the dependency pane, then select the
- React Burger Menu
- Type react-burger into the depency pane, then select
react-burger-menufrom the autocomplete dropdown.
- Type react-burger into the depency pane, then select
- React Router
- Type react-router-dom into the depency pane, then select
react-router-domfrom the autocomplete dropdown
- Type react-router-dom into the depency pane, then select
With your dependencies added, let's add the burger menu support. In the src directory, create two folders:
- components
- components/burger
Within components/burger, create the following files and paste the contents from below. We won't go into the code of the hammer menu too much in this tutorial. All we need to do is add subpages to the menu as needed. Feel free to play with the CSS if you want to customize the look and feel.
components/burger/burger.css
/* Position and sizing of burger button */
.bm-burger-button {
    position: fixed;
    width: 36px;
    height: 30px;
    left: 36px;
    top: 36px;
  }
   /* Color/shape of burger icon bars */
  .bm-burger-bars {
    background: #373a47;
  }
   /* Color/shape of burger icon bars on hover*/
  .bm-burger-bars-hover {
    background: #a90000;
  }
   /* Position and sizing of clickable cross button */
  .bm-cross-button {
    height: 24px;
    width: 24px;
  }
   /* Color/shape of close button cross */
  .bm-cross {
    background: #bdc3c7;
  }
   /*
  Sidebar wrapper styles
  Note: Beware of modifying this element as it can break the animations - you should not need to touch it in most cases
  */
  .bm-menu-wrap {
    position: fixed;
    height: 100%;
  }
   /* General sidebar styles */
  .bm-menu {
    background: #373a47;
    padding: 2.5em 1.5em 0;
    font-size: 1.15em;
  }
   /* Morph shape necessary with bubble or elastic */
  .bm-morph-shape {
    fill: #373a47;
  }
   /* Wrapper for item list */
  .bm-item-list {
    color: #b8b7ad;
    padding: 0.8em;
  }
   /* Individual item */
  .bm-item {
    display: inline-block;
    color: #b8b7ad;
  }
   /* Styling of overlay */
  .bm-overlay {
    background: rgba(0, 0, 0, 0.3);
  }
components/burger/burgermenu.js
import React from "react";
import { slide as Menu } from "react-burger-menu"
import "./burger.css";

const toggleMenu = ({ isOpen }) => {
 const menuWrap = document.querySelector(".bm-menu-wrap");
 isOpen
   ? menuWrap.setAttribute("aria-hidden", false)
   : menuWrap.setAttribute("aria-hidden", true);
};

const BurgerMenu = () => {
 return (
   <Menu noOverlay onStateChange={toggleMenu}>
       <a className="bm-item" href="/">Home</a>
       <a className="bm-item" href="/about">About</a>
   </Menu>
 );
};
export default BurgerMenu;
Now, replace the contents of App.js to configure your app to authenticate with ThoughtSpot. Your ThoughtSpot trial URL may begin with "my1.thoughtspot.cloud" or "my2.thoughtspot.cloud" instead of "try.thoughtspot.cloud", so match it accordingly. Save your changes
import "./styles.css";
import { init, AuthType } from "@thoughtspot/visual-embed-sdk";
import { Route, Routes } from "react-router-dom";
import BurgerMenu from "./components/burger/burgermenu";

init({
  thoughtSpotHost: "https://try.thoughtspot.cloud",
  authType: AuthType.None
});

function App() {
  return (
    <div className="App">
      <header>
        <BurgerMenu />
      </header>
      Hello ThoughtSpot!
    </div>
  );
}

export default App;
Finally, replace the contents of index.js with the following code, which tell React to use react-router-dom for navigation.
import React from 'react';
import ReactDOM from 'react-dom';
import { BrowserRouter as Router } from 'react-router-dom';
import App from './App';

ReactDOM.render(
 <Router>
   <App />
 </Router>
 ,
 document.getElementById('root')
);
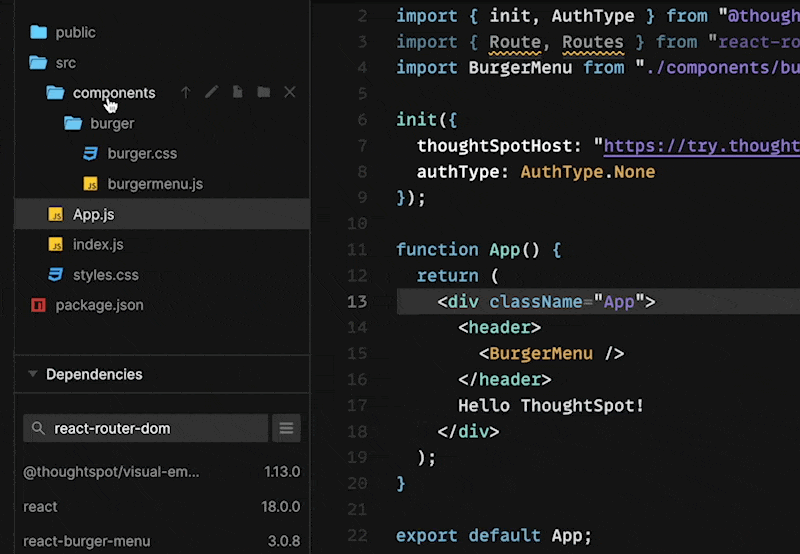
Once complete, your default app and project should look like this:

You will notice that the code includes some logic to authenticate with ThoughtSpot. In this tutorial, we are using AuthType.None. This will prompt the user to log in when the page loads. This is fine for the tutorial, but not recommended for a production app. For a detailed overview of security options supported by the Visual Embed SDK, please check out the online documentation.
With the app structure set up and running, the next task is to add a new page to embed a search component. Within your IDE, select the components folder and add a new file search.js
Then, add the required React and Visual SDK import to search.js
import React from 'react';
import { SearchEmbed } from '@thoughtspot/visual-embed-sdk/react';
And, finally add a search function below your imports. This function will return a snippet of HTML which gets rendered on display. Within this snippet we want to embed our answers component. Previously, in the Developer Playground section, you saw how you generate standard JavaScript code. For your convenience, the Visual Embed SDK also ships with React components. In this example, we will use the SearchEmbed component. You can view a complete example of search.js here.
export default function Search() {
 return (
      <div>
          <h1>Search</h1>
          <SearchEmbed frameParams={{hideDataSources: "true", height: "80vw"}} answerId={"YOUR-ANSWER-ID-HERE"}/>
      </div>
  )
}
Looking at the search embed component, you will see parameters you are already familiar with from the Developer Playground task previously. The most important parameter, however, is the answerId. Open up the Developer Playground, choose Search as the feature to embed, then Top 15 Last Month from the Select saved search dropdown. Copy the inserted id into your code between the double quotes, then save your file. That's it. Your search embed is complete.
Add routes and navigation
To add the new page to our navigation, we need to add the Search function to our Routes, then include the new route in the hamburger menu. Open App.js and add the following import. This tells our app where our search function resides. You can add this directly after the import for the BurgerMenu.
import Search from './components/search'
Next, we need to add routes to support navigation. Add the following code, directly after the element. Routes tells our app that when we enter a URI, in this instance, /search where we should route that request. We are also adding a home route to take us back to the route of our app.
<Routes>
  <Route path="/" element={<h1>Home</h1>} />
  <Route path="/search" element={<Search />} />
</Routes>
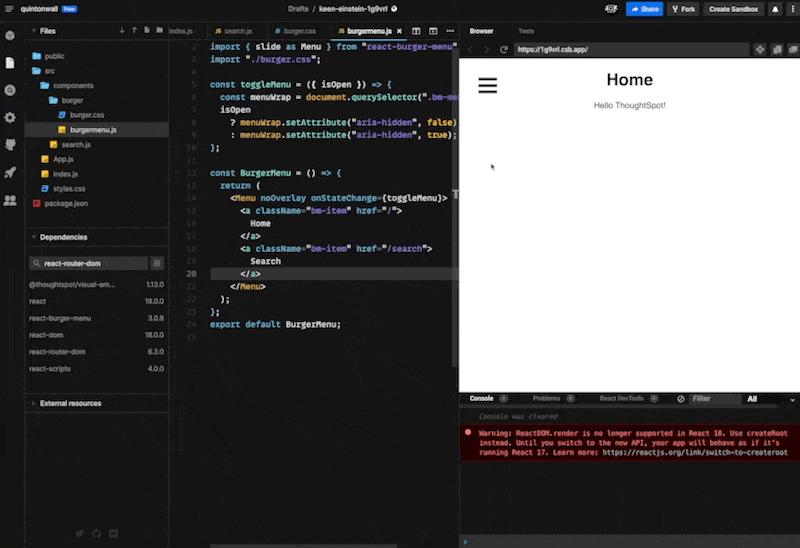
Finally, let's add the new route to the hamburger menu. Open components/burger/burgermenu.js and replace the /about a href with the following.
<a className="bm-item" href="/search">Search</a>
Save everything, and your app will automatically reload on the lefthand side. If everything is completed correctly, you will be presented with the home page as before, but now, when you expand the hamburger menu you will have an additional link, Search, included. Tap that link to open the new page. Since this is your first time accessing the page you will be prompted to log into ThoughSpot. Use your free trial credential and login. You should now see your embedded search component. Great job!
A little extra magic
One of the great things about developing with React is the wealth of third party libraries available. The hamburger menu we just used is a great example. This library saves a huge amount of effort in building typical app functionality. If you want to have fun with your app, try playing around with the animations available in the hamburger menu to give your menu a little extra bling. For example, my favorite is the Elastic animation. To use this animation to your app, open burgermenu.js and change the word slide for elastic in the react-burger-menu statement.
import { elastic as Menu } from "react-burger-menu"

You can also easily change the menu location from the left hand side, the default, to right:
<Menu right noOverlay onStateChange={toggleMenu}>
The react-burger-menu is a very useful react library. I highly recommend you check out all the features. It will save you a lot of time in your projects.
Embedding a liveboard component is very similar to what you just completed with the Search component. You need to create a new page and add the Liveboard component, then add it to your routes and the hamburger menu. Let's jump right in.
Create the Liveboard page
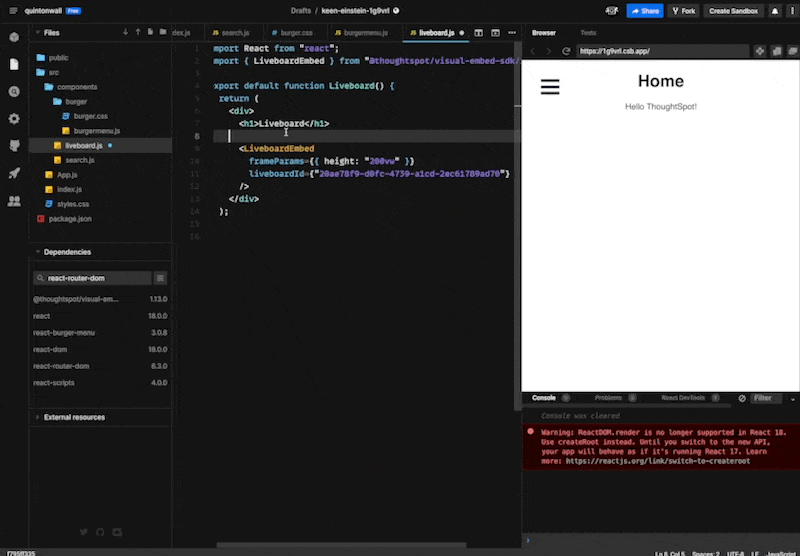
Add a new file, liveboard.js in the components directory, and use the Developer Playground to fetch the liveboardId for Sales Analysis Liveboard.
import React from 'react'
import { LiveboardEmbed } from "@thoughtspot/visual-embed-sdk/react";

export default function Liveboard() {
   return (
       <div>
           <h1>Liveboard</h1>
           <LiveboardEmbed frameParams={{height: "200vw"}}
                       liveboardId={"YOUR-LIVEBOARD-ID"}/>
       </div>
   )
}
Add Liveboard Route
Open App.js and import the Liveboard function after the Search import:
import Liveboard from './components/liveboard'
Then, add the function to the Routes element after the Search route:
<Route path="/liveboard" element={<Liveboard />} />
Add Liveboard to the hamburger menu
Open components/burger/burgermenu.js and add the link to the Liveboard route, after the Search navigation item:
<a className="bm-item" href="/liveboard">Liveboard</a>
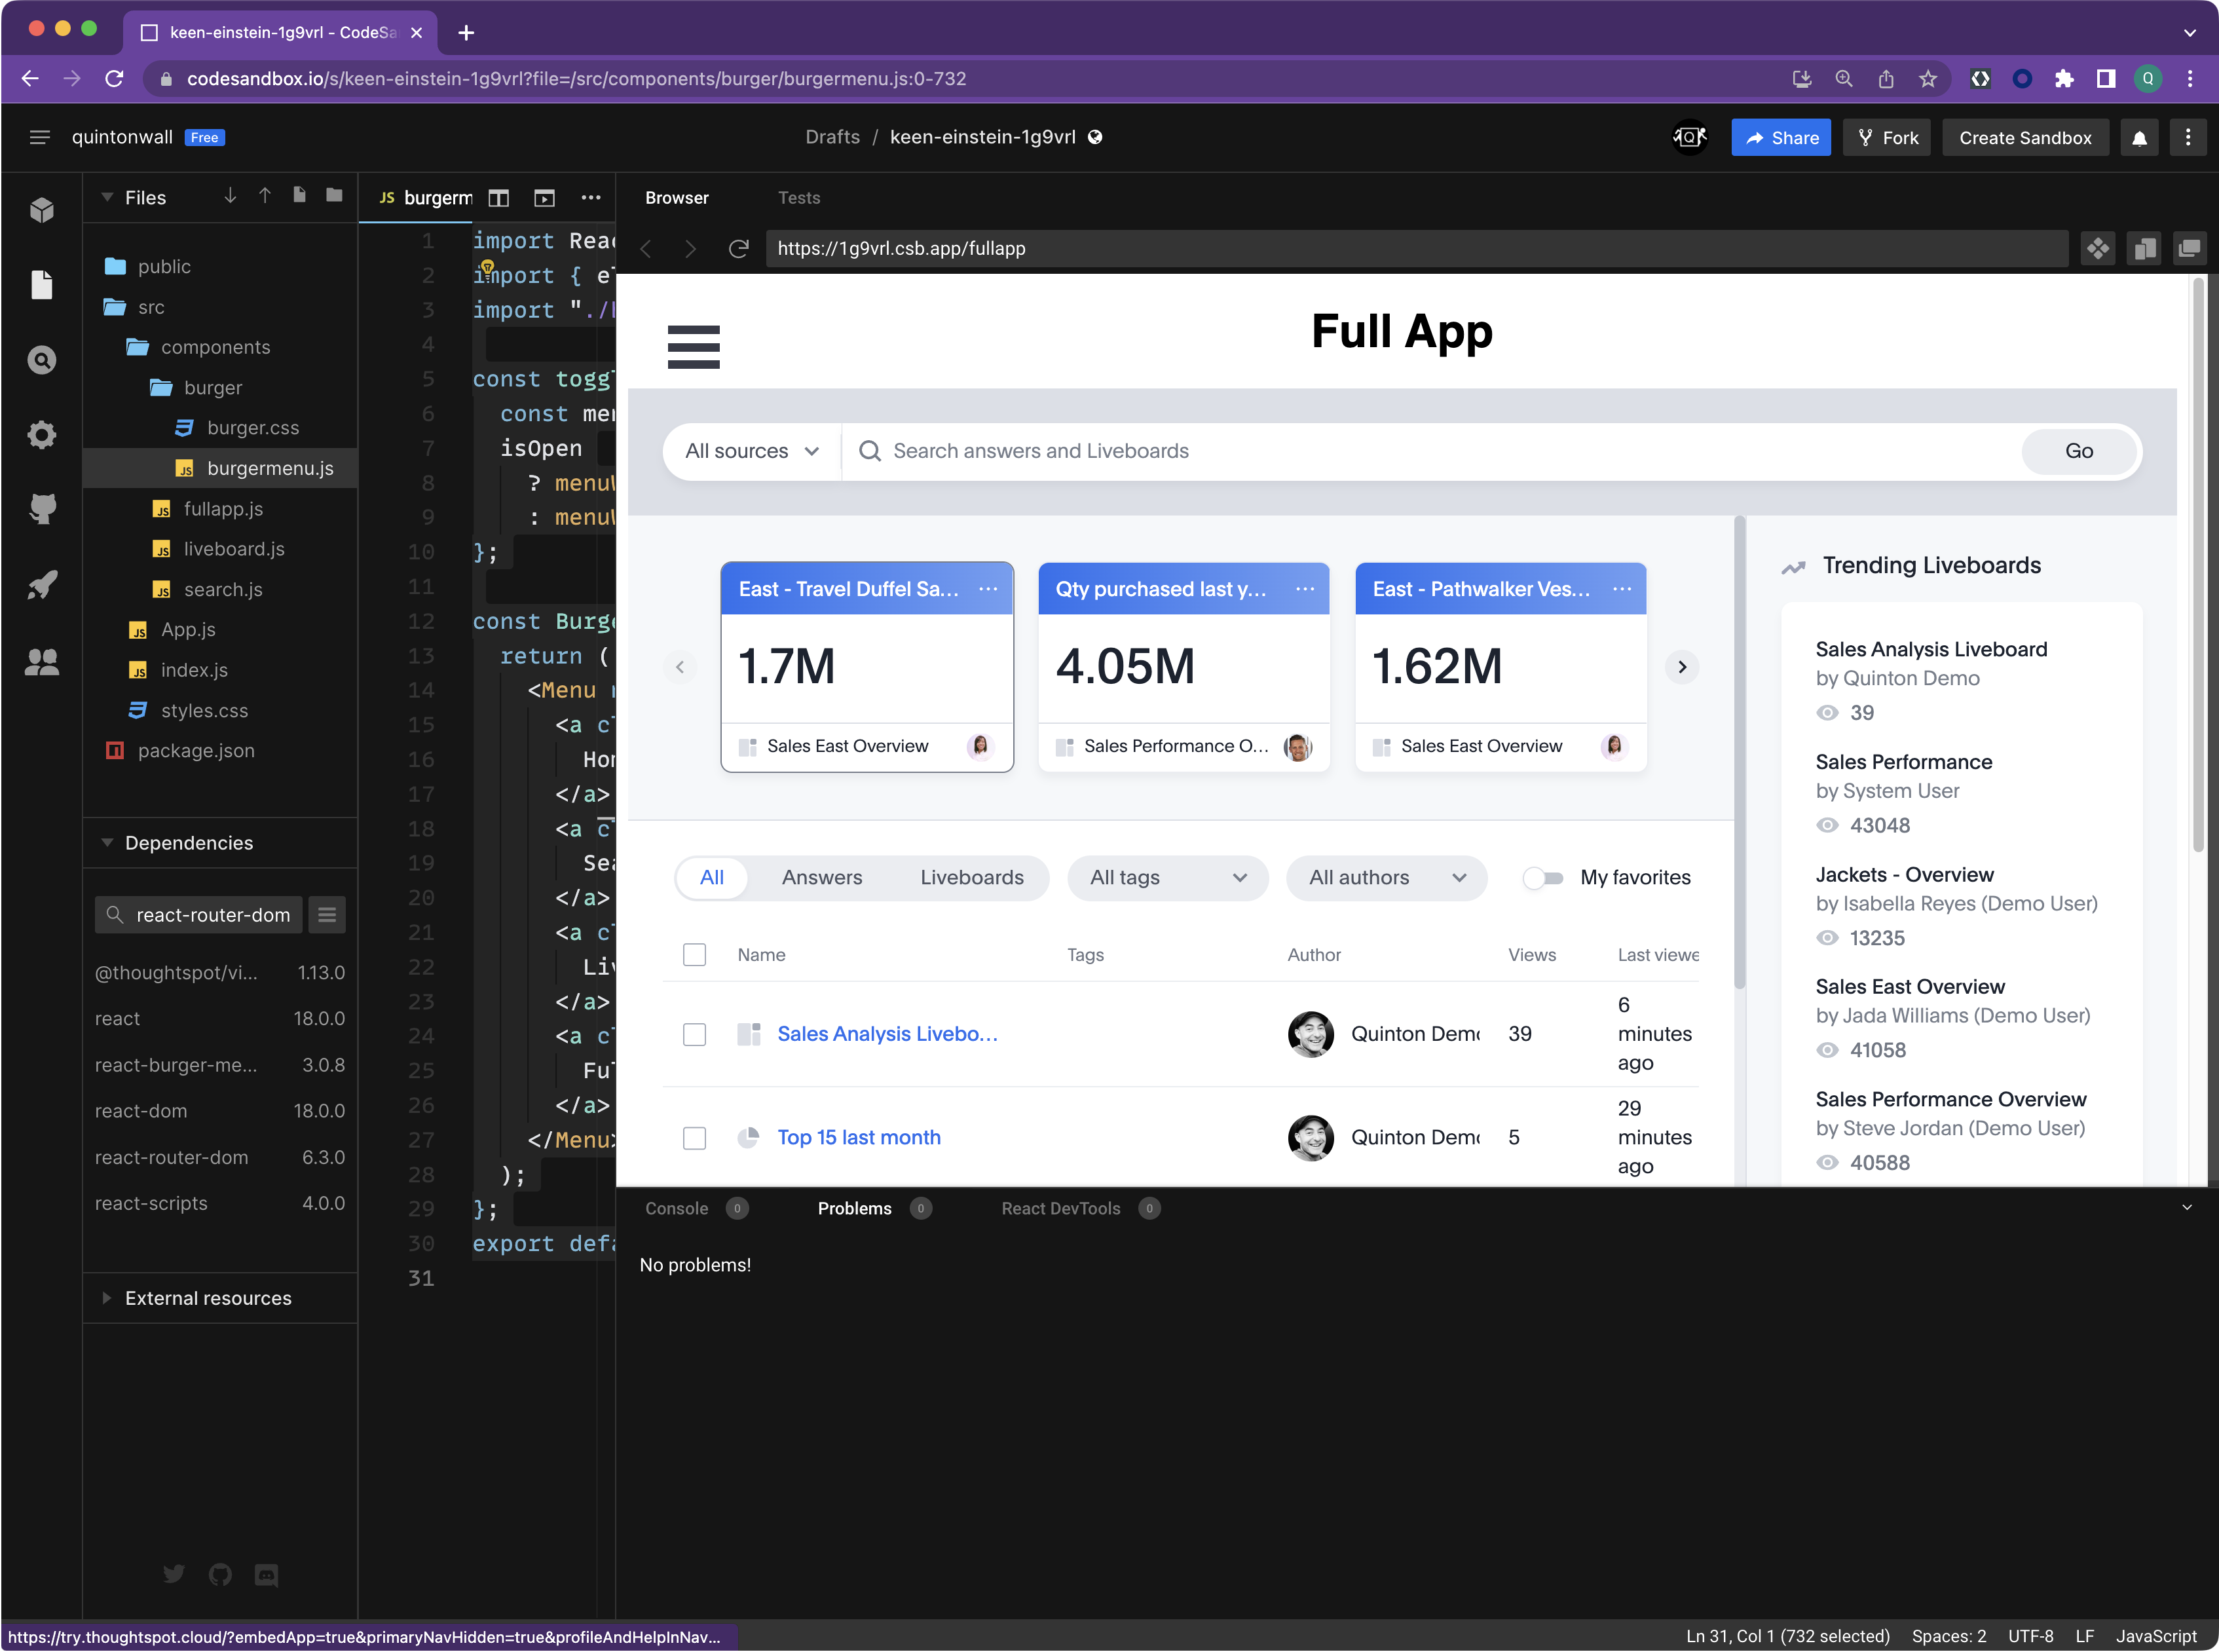
By now, you should be getting familiar with using the React components and adding them to your projects. The last type of component we will use is the FullApp component. As the name implies, this component embeds the full ThoughtSpot experience. Let's jump right in.
Create the Fullapp page
Add a new file, fullapp.js in the components directory. You will notice in the AppEmbed component, we don't need to pass in a specific id, instead we can use Page.* attribute. This attribute refers to the pages or tabs within ThoughtSpot. For example, I could use Page.Liveboards to point directly to the Liveboards page. For our app, we are going to point to the ThoughtSpot home page, using Page.Home. For a complete list of values check out the documentation.
import React from 'react'
import { AppEmbed } from "@thoughtspot/visual-embed-sdk/react"

export default function FullApp() {
   return (
       <div>
           <h1>Full App</h1>
           <AppEmbed frameParams={{height: "80vw"}} fullHeight="true"
                     pageId="Page.Home" />
       </div>
   )
}
Add Fullapp route
Open App.js and import the Fullapp function after the Liveboard import:
import FullApp from './components/fullapp'
Then, add the function to the Routes element after the Liveboard route:
<Route path="/fullapp" element={<FullApp />} />
Your App.js code should now look like this
import "./styles.css";
import { init, AuthType } from "@thoughtspot/visual-embed-sdk";
import { Route, Routes } from "react-router-dom";
import BurgerMenu from "./components/burger/burgermenu";
import Search from "./components/search";
import Liveboard from "./components/liveboard";
import FullApp from "./components/fullapp";

init({
  thoughtSpotHost: "https://try.thoughtspot.cloud",
  authType: AuthType.None
});

function App() {
  return (
    <div className="App">
      <header>
        <BurgerMenu />
      </header>
      <Routes>
        <Route path="/" element={<h1>Home</h1>} />
        <Route path="/search" element={<Search />} />
        <Route path="/liveboard" element={<Liveboard />} />
        <Route path="/fullapp" element={<FullApp />} />
      </Routes>
      Hello ThoughtSpot!
    </div>
  );
}

export default App;
Add Fullapp to the hamburger menu
Open ``components/burger/burgermenu.js` and add the link to the Liveboard route, after the Search navigation item:
<a className="bm-item" href="/fullapp">Full App</a>
Your burgermenu.js should now look like this:
import React from "react";
import { elastic as Menu } from "react-burger-menu";
import "./burger.css";

const toggleMenu = ({ isOpen }) => {
  const menuWrap = document.querySelector(".bm-menu-wrap");
  isOpen
    ? menuWrap.setAttribute("aria-hidden", false)
    : menuWrap.setAttribute("aria-hidden", true);
};

const BurgerMenu = () => {
  return (
    <Menu noOverlay onStateChange={toggleMenu}>
      <a className="bm-item" href="/">
        Home
      </a>
      <a className="bm-item" href="/search">
        Search
      </a>
      <a className="bm-item" href="/liveboard">
        Liveboard
      </a>
      <a className="bm-item" href="/fullapp">
        Full App
      </a>
    </Menu>
  );
};
export default BurgerMenu;
Save everything, select Full App from the hamburger menu, and you should see the entire ThoughtSpot instance embedded into your app. Not bad, huh?
ThoughtSpot Everywhere makes it easy to embed analytics into any webapp via the Visual Embed SDK. In addition to embedding components, the SDK also provides support for analytics lifecycle events such as when a search term has changed, new data is loaded, or a component is rendered on the page. In this tutorial, you will learn the different types of lifecycle events and how to utilize them to make more dynamic interactions. You will use the app you just created and extend it to support lifecycle events
Event Types
Lifecycle events fall into two categories:
- EmbedEvents
- EmbedEvents occur when the state of a component changes or is interacted with. This may be something like the component is rendered, new data is loaded, or a user clicks on a visualization
- HostEvents
- HostEvents are hooks to allow the developer to programmatically change or update an embedded component. For example, you may want to change the search term used, or enable/disable features
As mentioned in the previous section, EmbedEvents occur when the state of a component changes or is interacted with. To demonstrate, we will add a spinning animation to the existing liveboard page. This animation will display while the liveboard is fetching data and rendering. Once the liveboard has finished rendering, we will hide the animation by listening for an embed event, onLiveboardRendered
Add Antd library
To add the spinning animation, we will use a third-party library called antd. Antd has many great assets, styles, and components, one of these is a spinner, which is exactly what we need. Let's add antd as a dependency to your project
- Type antd into the depency pane, then select
antdfrom the autocomplete dropdown.
From within your CodeSandbox project, open src/components/liveboard.js. This file is where we embed the Liveboard component. Currently, the page does very little beyond embedding the component. Let's start by adding the required imports for both antd and to start listening for ThoughtSpot events. At the top of your file, update your imports to match the following:
import React from 'react'
import { LiveboardEmbed, useEmbedRef } from "@thoughtspot/visual-embed-sdk/react";
import { EmbedEvent, Action  } from "@thoughtspot/visual-embed-sdk";
import { Spin } from "antd";
To make everything work, we will take advantage of the React framework's state mechanism via useState to keep track of when we should show or hide the spinner. Within the Liveboard function, add the following line near the top:
const [isLoading, setIsLoading] = React.useState(true);
We will also add a handle to the Liveboard component using the embedRef handle. embedRef is more useful for working with Hosted Events, which we will cover shortly, but it is a good practice to get used to always setting the reference in your components. To get started, add the following code directly before the useState call:
const embedRef = useEmbedRef();
Next, we will update the current LiveboardEmbed component with event handler functions. Scroll down until you see the ThoughtSpot component.
<LiveboardEmbed frameParams={{height: "80vw"}}
                             liveboardId={"YOUR-ID-HERE"}/>
And change it to following. Remember to use your liveboardid. Don't replace it with YOUR-ID-HERE ;)
<LiveboardEmbed frameParams={{height: "80vw"}}
                   liveboardId={"YOUR-ID-HERE"}
                   ref={embedRef}
                   onLoad={onLoad}
                   onLiveboardRendered={onRendered}
                   />
There is a lot going on here. First, we added a hook to the embedReference via the ref attribute. Then, we've included two lifecycle events onLoad and onLiveboardRendered. We are going to use these events to show and hide our spinner. Since CodeSandbox dynamically reloads your changes, you will see a lot of errors in your project. Don't worry. We will fix these next.
Add Lifecycle constants to handle callbacks
Currently, the lifecycle event attributes point to constants which do not exist. Let's go ahead and create these now. You can add them directly after the useEmbedRef() call. Now, when the ThoughtSpot platform fires the onLiveboardRendered event we will setIsLoading to false.
const onLoad = (e) => {
       console.log("Loading liveboard");
   };

   const onRendered = (e) => {
       console.log("Loading now rendered")
       setIsLoading(false)
   };
Show / Hide component
All that is left to do is to add some logic to show the spinner or the Liveboard component based on the value of isLoading. We can do this with a quick boolean check:
                {isLoading ? (
                      <div className="embedSpinner">
                        <Spin size="large" />
                      </div>
                  	) : (
                    	""
                   )}
                   <LiveboardEmbed frameParams={{height: "200vw"}}
                   liveboardId={"YOUR-LIVEBOARDID-HERE"}
                   ref={embedRef}
                   onLoad={onLoad}
                   onLiveboardRendered={onRendered}
                   />
Your full liveboard.js should now look something like this:
import React from "react";
import {
  LiveboardEmbed,
  useEmbedRef
} from "@thoughtspot/visual-embed-sdk/react";
import { EmbedEvent, Action } from "@thoughtspot/visual-embed-sdk";
import { Spin } from "antd";
import "antd/es/spin/style/css";

export default function Liveboard() {
  const [isLoading, setIsLoading] = React.useState(true);
  const embedRef = useEmbedRef();

  const onLoad = (e) => {
    console.log("Loading liveboard");
  };

  const onRendered = (e) => {
    console.log("Loading now rendered");
    setIsLoading(false);
  };

  return (
    <div>
      <h1>Liveboard</h1>
      {isLoading ? (
        <div className="embedSpinner">
          <Spin size="large" />
        </div>
      ) : (
        ""
      )}

      <LiveboardEmbed
        frameParams={{ height: "200vw" }}
        liveboardId={"YOUR-LIVEBOARDID-HERE"}
        ref={embedRef}
        onLoad={onLoad}
        onLiveboardRendered={onRendered}
      />
    </div>
  );
}
As soon as CodeSandbox can compile successfully, your changes will automatically be reflected on the embedded browser on the righthand side. Rendering happens very quickly. You may miss the spinner. If so, a good trick is to copy the URL into a new window to force the browser not to load from cache.
So far we have seen how to add hooks to lifecycle events of ThoughtSpot components. Now, we want to see how to interact with the components programmatically via Host Events. To quickly recap, Host Events are where you want to programmatically interact with a ThoughtSpot component. You can think of Host Events as you talking to the component vs. Embed Events as the component talking to you.
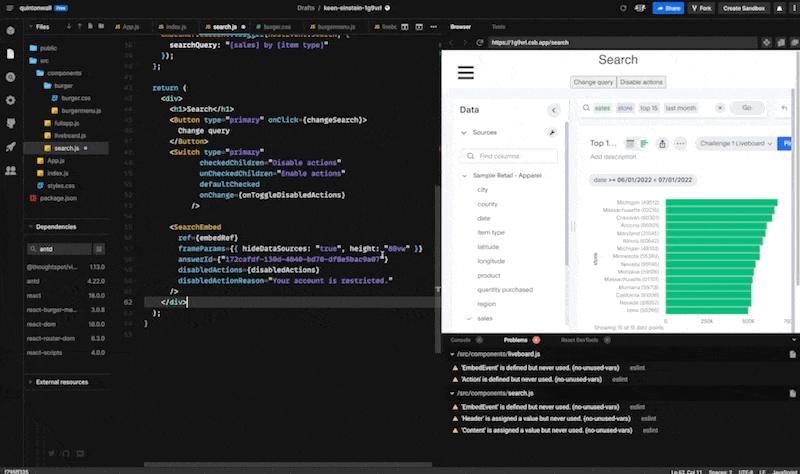
We will update search.js to perform two operations: firstly change the search terms from code, and secondly enable and disable actions a user can perform.
Within your IDE, open /components/search.js and add the following imports:
import React from 'react'
import { SearchEmbed, useEmbedRef } from '@thoughtspot/visual-embed-sdk/react';
import { EmbedEvent, Action, HostEvent } from "@thoughtspot/visual-embed-sdk";
import { Layout, Button, Switch } from "antd";
const { Header, Content } = Layout;
Then, define a handle to the embedded component, by adding the following line to the top of the search function:
const embedRef = useEmbedRef();
And adding the ref attribute to the SearchEmbed element:
<SearchEmbed
    ref={embedRef}
    frameParams={{ hideDataSources: "true", height: "80vw" }}
    answerId={"YOUR-ANSWERID-HERE"}
   />
Add changeSearch function
Now that we have the handle, go ahead and add a changeSearch function after the embedRef definition. This function will use the embedRef to trigger a HostEvent. We are going to use HostEvent.Search to change search terms. HostEvent has a number of useful event types in addition to Search, worth checking out.
const changeSearch = () => {
       embedRef.current.trigger(HostEvent.Search, {
         searchQuery: "[sales] by [item type]",
       });
     };
As you can see in the function above, HostEvent.Search takes a searchQuery parameter. This is extremely useful when you want to pass in dynamic search terms. For example, you could pass in a sales reps region dynamically when the page loads, or set a default term based on the time of day.
Call changeSearch
All that is left to do is add some functionality for us to call the changeSearch function. For our example, let's connect it to a button. Go ahead and add a button into the
tag and save your changes.
<Button type="primary" onClick={changeSearch}>Change query</Button>
Your final search.js should look like this:
import React from "react";
import { SearchEmbed, useEmbedRef } from "@thoughtspot/visual-embed-sdk/react";
import { EmbedEvent, Action, HostEvent } from "@thoughtspot/visual-embed-sdk";
import { Layout, Button, Switch } from "antd";
const { Header, Content } = Layout;

export default function Search() {
  const embedRef = useEmbedRef();

  const changeSearch = () => {
    embedRef.current.trigger(HostEvent.Search, {
      searchQuery: "[sales] by [item type]"
    });
  };

  return (
    <div>
      <h1>Search</h1>
      <Button type="primary" onClick={changeSearch}>
        Change query
      </Button>
      <SearchEmbed
        ref={embedRef}
        frameParams={{ hideDataSources: "true", height: "80vw" }}
        answerId={"YOUR-ANSWERID-HERE"}
      />
    </div>
  );
}
Try it out
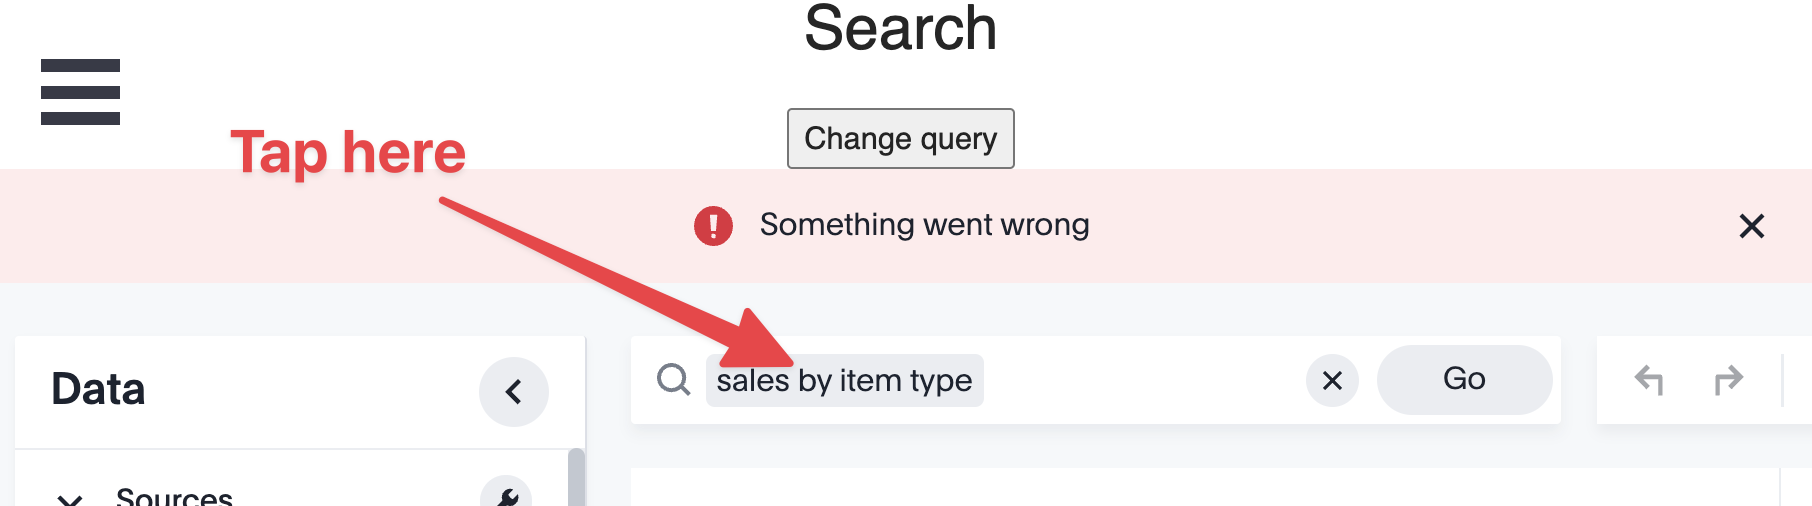
Tap on the hamburger menu and choose Search. You should now see the embedded search component, plus a new button, Change query, at the top of the page. Go ahead and tap the button to see your search terms added to the embedded search box.
Note: If you happen to receive an error message stating Something went wrong, simply tap the search line to allow the app to correctly split the search term. This appears to be a conflict in CodeSandbox and Chrome's rendering.
Enabling and disable actions with Host Events
Now that you have a good understanding of how to work with Host Events, another very common customer request is to dynamically enable or disable actions based on the user. This can be achieved by using the disableActions attribute of the ThoughtSpot components.
Create ActionSets
Let's start by creating two sets of action constants: one set for default, and another that we will use to enable/disable. Go ahead and add these at the top of your components/search.js file, directly below the imports, but outside of the search function.
export const actionSet = [
 Action.Subscription,
 Action.Share,
 Action.Save,
 Action.Edit,
 Action.EditTitle,
 Action.Explore,
 Action.Pin,
 Action.SpotIQAnalyze,
 Action.DrillDown
];

export const defaultActionSet = [
 Action.Subscription,
];
Taking a look at the code, you can see we are taking advantage of the Action enumeration. This enumeration contains all of the actions a user can perform on ThoughtSpot elements such as search and Liveboards. For our example, we've included the common ones for search.
Set Disabled Actions
Next, we need to store the state of whether actions are enabled or disabled and provide accessor functions to change it. Add the following inside the search function, directly after the useEmbedRef() call.
const [disabledActions, setDisabledActions] = React.useState([]);

     const onToggleDisabledActions = (checked: boolean) => {
         if (checked) {
           setDisabledActions([]);
         } else {
           setDisabledActions(actionSet);
         }
       };
We also need to update the Search component to accept an enumeration as well as provide a reason why elements are disabled. The disabled reason will appear in a tooltip when a user hovers over a disabled element. Update your search component so it looks something like this. You will notice that we are using the disabledActions enumeration we previously put into session state. Remember, your datasource-id will be different from the example below.
<SearchEmbed
    frameParams={{hideDataSources: "true", height: "80vw"}}
    ref={embedRef}
  	answerId={"YOUR-ANSWERID-HERE"}
    disabledActions={disabledActions}
    disabledActionReason="Your account is restricted."
/>
Set Disabled Actions
All that is left is to add a toggle to our sample app to enable and disable actions. Since we already installed antd in the Embed Event section, we can take advantage of the Switch component. Go ahead and add the following to the header section of your page, directly after the button for setting search terms:
<Switch type="primary"
  	checkedChildren="Disable actions"
 		 unCheckedChildren="Enable actions"
  	defaultChecked
  	onChange={onToggleDisabledActions}
  />
Your final search.js should look like this:
import React from "react";
import { SearchEmbed, useEmbedRef } from "@thoughtspot/visual-embed-sdk/react";
import { EmbedEvent, Action, HostEvent } from "@thoughtspot/visual-embed-sdk";
import { Layout, Button, Switch } from "antd";
const { Header, Content } = Layout;

export const actionSet = [
  Action.Subscription,
  Action.Share,
  Action.Save,
  Action.Edit,
  Action.EditTitle,
  Action.Explore,
  Action.Pin,
  Action.SpotIQAnalyze,
  Action.DrillDown
];

export const defaultActionSet = [Action.Subscription];

export default function Search() {
  const embedRef = useEmbedRef();

  const [disabledActions, setDisabledActions] = React.useState([]);

  const onToggleDisabledActions = (checked: boolean) => {
    if (checked) {
      setDisabledActions([]);
    } else {
      setDisabledActions(actionSet);
    }
  };

  const changeSearch = () => {
    embedRef.current.trigger(HostEvent.Search, {
      searchQuery: "[sales] by [item type]"
    });
  };

  return (
    <div>
      <h1>Search</h1>
      <Button type="primary" onClick={changeSearch}>
        Change query
      </Button>
      <Switch
        type="primary"
        checkedChildren="Disable actions"
        unCheckedChildren="Enable actions"
        defaultChecked
        onChange={onToggleDisabledActions}
      />

      <SearchEmbed
        ref={embedRef}
        frameParams={{ hideDataSources: "true", height: "80vw" }}
        answerId={"YOUR-ANSWERID-HERE"}
        disabledActions={disabledActions}
        disabledActionReason="Your account is restricted."
      />
    </div>
  );
}
Try it out.
Save your changes, and check out all of your hard work. Now when you go to the Search page, you will see your answer results
Once the results are rendered, hover over the pin button, or the icons to the left of the pin button. You will notice they are enabled, with context sensitive tooltips.
Now, tap the Disable actions button, and enter a search term. This time, you will see the actions are disabled with our disabled message replacing the previous contextual tooltips.
At this stage, you've completed your app and should have a great understanding of how you can use the Visual Embed SDK. Give yourself a pat on the back. Great job! If you run out of time, or are having trouble getting everything working, check out the completed app and compare your code.
Congratulations. You have completed the ThoughtSpot Developer Workshop. Thoughout the workshop, you've created an instance of ThoughtSpot, complete with sample visualizations to find insight from business data, and built an entire web app to embed these components using the developer tools and SDKs provided by ThoughtSpot Everywhere.
We've only scratched the surface of the features available to developers with ThoughtSpot Everywhere. To keep learning more, the following guides are a great starting point:
- Setting up your local development environment.
- An overview of authentication and security settings.
- Using custom actions
- Working with the REST API
Still want more? Try the bonus exercises to learn how to use the ThoughtSpot Everywhere platform APIs and TML.